December 23, 2009

Turtle Parade and Holiday Treats

Playing with my new Fox and Friend set.  Here's something I whipped up.


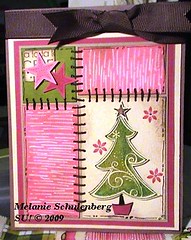
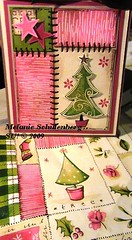
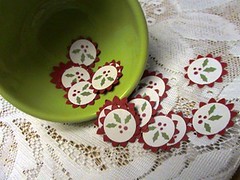
Paper:  Durango, Olive, Chocolate, Vanilla
Ink:  Olive, Durango, Curry, Chocolate
Stamp:  Fox and Friends (Occasion Mini) and Trure Friends.  If you look close at the chocolate card stock you can see the text from that set.  The "Thank You" is from the Overall set.
Accessories:  The leaf is from the "Two-step bird" punch and the decorative edge for the label is the "Scallop Trim Border" from the upcoming SAB catty.


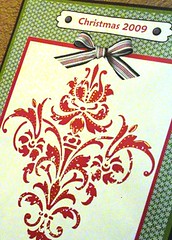
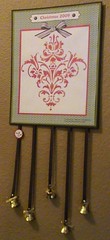
Here's some other things I"ve been working on. 

Making some imitation Thin Mints for holiday gifts.  So many friends enjoy hand-made goodies but rarely have the time to make them.

The recipe is easy.  You only need three things:

  • Ritz Crackers
  • 1 block Almond Bark (that large block of chocolate)
  • Peppermint OIL


Chop your chocolate so it's easier to melt.


You want to use a double broiler.  I make my own.  Just fill a pot with 1/2 cup of water and let it simmer.  Place a smaller metal pot on top to melt the chocolate.  Here I'm using a mixing bowl.


Once the chocolate is melted, add 3 - 4 drops of oil.  Make sure it's OIL and not extract.  BIG difference.  Sometimes when pouring oil out it hugs the side of the bottle.  To eliminate that I simply rest the bottle on the side of my fork and let it drip down the side.

Dip Ritz in chocolate to coat, and remove it with a fork.


Lay them on wax paper, this will help to remove them easily.  I cut the Ritz box and lay the paper on top of that.  After the tray is filled I put them in the freezer to chill for a minute so I can move them without chocolate getting all over.  Then I can reuse the tray.


I placed a few of the cookes inside some saran wrap, tied them up and wrapped some holiday fabric around them. 

Use a plate to trace a circle and cut around them with pinking shears (because it makes the edges pretty).


I added some of my Advent MDS prints and a gold ribbon to tie it up.


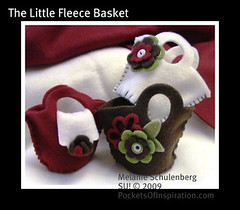
Here's a couple of bags I've made. 


Now, back to stamping!

Melanie

December 22, 2009

The Tulipe Umbrella

Thought I'd pop in and share something I created a week ago.  I've so busy chugging away at my latest adventure.  It's intense and exciting!!!!  I'll be sharing it all with you the day after Christmas, so mark your calendars.
I've altered yet another Dollar Store product.  I have to be in that store at least 4 times a week (I am NOT kidding).  Take a look at this Dollar Store umbrella I've gussied up.


I've added a Vinyl applique to the front.  It was cut from the vanilla vinyl sheets Stampin Up! offers using the Tulipe Bigz.  Kind of neat huh?  It was really easy.  Just plop a book under the umbrella and start attaching your vinly Decor Element.

I know what you're going to ask next.  Is it going to hold up to the rain?  Well, I ran it under the sink and it faired well, what's a few raindrops? Besides, the umbrella was only a dollar.  This Tulipe applique makes more elegant. 

The Tulipe is only on one panel, but I have plans on adding it to every other panel (four all-together).

So, does that get your creative gears going?  As soon as I attached the applique, I picked up my pink flowers (that were precut from SU!, not by me) and have plans to add them to the grey umbrella I purchased.  I also purchased a Teal umbrella.   Wouldn't flowers look great running along the edge of the umbrella, or cascading from top to bottom?  What about those cute little animal appliques that are precut?  Super cute!  Check out the other colors of Vinyl currently on sale.

OK...I must get back to my project.  It's been quite a few long days and nights.  The family has been surviving on pizza rolls.

Have a great night

Melanie

December 19, 2009

Mojo Scallops

Yes, I've been absent for a few days.  I'm working on something really exciting that will be unveiled the day after Christmas.   It's taken lots of time to coordinate and prepare for.  With the unveiling so close, there's the inevitable tweaking here and there which requires me to be away from my blog.

I did however manage to compelte my first ever Mojo Monday Challenge.  I've been wanting to participate for a while, but something always seems to get in the way.  Not this time.

Without further ado, here is my creation for Mojo #117.


Before you say anything I know it's missing the bow on the right.  I couldn't bare putting it on and covering up that awesome ribbon.  It just would have been to much extra.  Besides, I've noticed there were a few other cards that omitted it.

There was also the option of adding a button to the center of the flower but again, too much.  I must have put that button on and off for over 1/2 hour trying to decide.  Geesh!  Anyone else have that kind of dilema when designing a card?

Now, off to work on some other projects whilst the kids are away watching the Saints game.  Quiet time, yeah. 

Have a great night.

Melanie

December 15, 2009

A Whosville Color Palette

Moving on with my gift wrap inspired card creations.  Here's my second using the same gift wrap I used in my prior post, using a different section of the paper. 

It's unusal to use pinks this time of year.  After posting my last gift wrap inspired card, Kathy Strubel emailed and said it reminder her of Dr. Suess.  I totally agreed.  In fact, it reminded me of the Who's in Whosville.  Fun and cheery.


Here's a close-up of the center star.


Used my little leaves sizzlet to create the leaves here.  They were cut, sponged and then hand-drawn lines brown marker.  The white snowflakes were created with the white signa-gel pen.

See the rich pink color in the background of the snowflake?  I used my watercolor wonder crayons to create that depth.  You've gotta love those crayons!  Just scribble some of the crayon on your Regal Rose cardstock and smudge away with your finger.  Of course you can activate the wax crayon a bit with water, (and I did), but smudging also gives it a randomness of where the color is distributed.


The scripted text are words from the song "My Favorite Things".   Didn't have a clue as to what the text on the Gift Wrap said so I opted to write something myself.  The song is not written word for word (couldn't really remember all the words), so I only jotted down the lyrics I knew.  It was all done in a Close to Cocoa marker.

The text around the Regal Rose and snowflake square says "Joy".  If you look closely at the written text around the square on the gift wrap, you'll notice it's Gregg shorthand (remember that???).  You know, I took shorthand in school but couldn't remember a lick of it when looking at this paper. I think it has something to do with trimming a tree.  Still, it looked great around the square so I added something of my own, "Joy".


Below is the gift wrap I've been using for inspiration.  There are still many options for card samples.  The music note heart is my next inspiration.  I think that heart is what drew my attention to the paper in the first place, well that and the writing on the paper.   


Anyone up for a little gift wrap Inspiration Blog Hop?  Create a card, scrapbook page or anything using the gift wrap paper here as your inspiration.  You don't need to have squares and rectangles like I did.  Try creating just the snowman, just the tree or any of the other features.

If you're interested, just email me by Friday so I can get a head count and we'll post our creations first thing Tuesday (that'll give you an entire week).  We'll post our creations Tuesday morning to share with everyone.

Hope your day is filled with inspiration.

Melanie

December 11, 2009

Fleece Basket Bundle

WOW!  Thanks for all the great feedback on my Little Fleece Baskets.  

The Baskets and Blooms die I've only used a few times.  I find working with paper more difficult than using the fabric (for this particular die, which is why I went the fabric route).  Not that you can't use paper, the fabric is just more...forgiving.

All those who asked about specific fabric types, I used fleece for this project but felt works just as well.  I've even used cotton before but typically give it some sturdier backing, like that fusible stuff (note to self, brush up on sewing terms).

I think the largest response came from those who enjoyed the project, but don't have the Baskets & Blooms die (which I might add went on sale today).  Being that it is the holiday season and these baskets are great for creating and putting small gifts inside (I'll be stuffing these darlings with cookies).  I've put together a little Fleece Basket Bundle for you.  Take a peek:


Fleece Bundle includes:
  • Precut fleece baskets in all four colors (olive, brick, ivory, chocolate)
  • Floss for stitching (Chocolate and Brick)
What is not included
  • Stitched green leaf (which is not available officially until January)
  • Buttons
  • Stitched olive/ivory center on brown basket (offically not available until January 1st)
To remedy the leaves I've included extra green fleece to cut your own (which adds more personal charm to your basket).  As for the button, well, surely you have buttons lying around.  What, no buttons?  Try substituting a bead, rhinestone, pearl or some other small item.  Have fun with it.  There are lots of possibilities.  My goal is to simply offer you the precut baskets so you can at least get started.

A few more ideas of how to assemble your projects.


Each basket shown here was created using just the pieces from the four baskets (although the green basket isn't shown).  Just switch the pieces and parts around until you're satisfied with something you like.

Did you notice the ivory flap on the brick colored basket?  It's the tag piece from the Basket & Blooms die.  My 5 year old called dibs on that one (...wish I could share the expression on my face when he threw that out at me).  I think he was intrigued by the chocolate flower on the end.

A few more close-ups.


Here's the white basket with a button for the flower center.


Here's what the back of the flower looks like if you decide to use the backside.  See the versatility?


So, if you're interested in creating four of these colorful fleece baskets yourself, they're available for $5.00, plus $2.50 for shipping and handling.

To purchase via paypal:


Any questions, feel free to email:  me@pocketsofinspiration.com

If you're interested in more than one set please email me before paying so I may adjust your shipping price.  It'll save you some buckaroos.  All is sent first class mail unless you're over anxious to get your hands on these babies and want them shipped 3-day priority.

Toodles.

Melanie

December 10, 2009

The little fleece basket

What is it about the holidays that beckons us to create?  I'm gonna go out on a limb here and say it's so darn cold outside, what else is there to do?  Just kidding.

What paper crafter do you know that isn't creating something at any given time during the week?  It's not just "paper" crafters either, it's crafters in general.  They are drawn to the hand-made item. 

The past week I've been sucked into a blogger warp, jumping from blog to blog absorbing all of the awesome ideas I'd like to incorporate into my own hand-made art.   So many ideas, so few hours in the day. 

For the past year (possibly longer) I've been seeing more and more stitched felt and fabric pieces.  Here I've tried my own hand at creating just that.  I call it, The little fleece basket


This little beauty was created with my Big Shot die and the 'Basket and Blooms' Bigz die (which I should add is exclusive to SU!).  The Bigz dies are designed to cut through fabrics and other non-paper products.

So, off I went to the fabric store to pick up my brown floss I so deseprately need for the project in my preivous post, knowing all to well once inside I'd be wandering the store checking out fabric.  Proudly I exited the store with only four items to purchase (way below my regular costly fabric sprees).

Let's cut to the chase (I need to hit car pool soon..it's so cold outside....don't want my kiddos freeze).

To create these little baskets yourself, simply run the die through the Big Shot and stitch it up.  Fleeced was used here, but I've used felt before and it works just as well (just not as soft).

As mentioned before, I am not the best at sewing, so these babies were stitched along the sides using some sort of stitch that, well, keeps the sides together.  Goodness, there's a name for it...it's just eluding me (gotta get the kids!!!).

My original idea was to just run a quick stictch along the sides with the sewing maching and use my pinking shears to make a decorative edge.  It doens't get much easier than that.  Once I started stiching the outside I blew off the pinking shears.  The dog was staring at me and I lost my train of thought...really. 

Check out the image on the bottom right. 


The red with the notches is actually the base die cut of the basket.  I layered the other pieces like this to show you how easily it is to make a flower.  I'll do more later (gotta get the kids)!

That white circle on top of the green circle, as well as the green leaves are the new Stitched Felt "Sweet Pea" SU! will be carrying in the Occasion Mini coming out in January.  Yeah, LOTS of goodies in there. 

OK..I'm outta here.  Try your hand at this...they're fun!

Toodles.

Melanie

December 8, 2009

Bubblegum Inspiration

Bubblegum inspiration may be somewhat of a stretch for this post title.  It refers to the color in this wrapping paper I found tucked in my stash of collectibles.  How often do you find the color pink used during the Christmas holiday?

Not sure where the paper came from.  I believe it's left over from a gift I received, really I can't remember.  I collect so much stuff; honestly, it's possible I'm part squirrel.  How ironic that squirrels are my LEAST loved four legged creatures??

The colors in this gift wrap were very appealing, as well as the artwork.  So folk-artsy.  The stitiching around the squares, the quiliting pattern.  All around, something wonderful to use for inspiration, which is exactly what you'll see below.

Here is a card I completed using part of the pattern from the paper.


Here is the card with the section of the paper used for reference.  What do you think?


The stitching was all by hand.  I've been wanting to 'stitch' something.  How odd is that, the NEED to stitch? 

Several products and techniques were used to create the shading; inks, watercolor pencils, chalks; whatever I had on hand was put into play (more experimental than anything).  Just playing.

The star images and tree used were Stampin Up! sets.  The white stripes on the Regal Rose card stock is a white gel pen.  Brown sewing thread was used, due to the fact I didn't have a single brown embroidery thread in my floss basket.  Well, not the brown I wanted.  So, the alternative was to use regular brown thread, four layers of it to achieve the thickness.  Somehow the card just doesn't have the write 'feel' to me knowing that I couldn't use floss like I wanted.

Guess this calls for a road trip to tomorrow to pick up some floss in the dark brown; which surely will come in useful for future hand-stitched projects.

Toodles.

Melanie

December 5, 2009

Sending Love Sneak Peek

I've been having fun setting up my future ADVENTURE.  Soooooooooooo excited about it.  It will all be revealed soon.

Until then, enjoy this sneak peek of the DELICIOUS paper "Sending Love" I pre-ordered from the upcoming Occassion Mini from SU!.  These images are good, but you have no idea how awesome this paper looks in person.  Thick and SPARKELY.  One side of ever sheet has embossed glitter on it. 

I used "My Digital Studio" to create this pretty mosaic of paper.  Nice huh?


This paper is going to make my Valentine projects amazing.   Its got such a great weight to it.  Don't you think this will look awesome for wrapping small gifts???

Did I mention that this scrumptious paper is only one of many surprises in the Stampin' Up! Occassions mini?  The biggest news are the CLEAR STAMPS!!  Yeah, no one can ever say SU! doesn't listen to their consumers.

Starting in January, you can order the same great vulcanized rubber stamp, except now it has a self-cling adhesive on the back (a 1/4" thick foam back).  The cling stamps will be available in a few select sets to start with, and the wood stamps are still available.

Here's one of the cutie stamps I pre-ordered, "Fox and Friends".  It cooridnates with the Decor Element which use the same images. 


Here is how they are pacakged ,in this great plastic CD case.


Tomorrow, maybe, jussssssssssssst maybe, I'll share the new "Flat Punch" I pre-ordered.  Can you stand the wait?  Did I mention the little glassine envelopes?  Oh, there's NO end!

Have a great night!

Melanie

Paper Crafters Sampler

Something's coming!!!

December 2, 2009

Flourishing Advent

Brainstormed for two weeks to design an A-typcial advent calendar.  My original plan was to sew something, but as the 1st of the month grew closer my plans of sewwing diminshed.

Enter, My Digital Studio. the new digital software program from Stampin' Up!   A quick click and dragging of the mouse and, WALLA!


Well, there was a little more designing on my part but hey, I think for a quickie Advent assembly it came quite nice.  Here's a full view:


Here are the Hollies for counting down the days.  Just attach one to the ribbon for each day until Christmas.


Another close-up of the detail.  Doesn't the ribbon look real?  I've taken my gold Zig and embellished this color copy.


Now for the fun part.  Enjoy a complimentary PDF of this Advent (available in red and chocolate) for your home.  The files are accessible in the group "Flourish Advent" on my Pockets of Inspiration.NING site.  The site Flourish Advent is open to anyone (along with suggestions on assembly).  You can download both the Chocolate and the Red if you like.  There's a seperate PDF for the hollies.

Enjoy!

Melanie

December 1, 2009

Sheet Music Wash

Want an easy idea for sprucing up your artwork?  How about getting a few pages of your sheet music and applying a light color wash to them?  Here's how.

Grab your favorite shade of paint.  Squirt a little dab onto a non-porouse surface.  I tend to use waxed paper as it's inexpensive and disposable when I'm finished (saving time on clean up).

Dip your paint brush in water and then into the paint, swirling around so the paint is no longer opaque and apply right over your sheet music.  The more you apply the darker the paint becomes (yes, even if it's diluted).

You can add another complimentary color while the paint is still wet so you get a nice blending effect, but don't over do it.  Remember, you're working with paper and it will start to warp.  Let the paper dry completely and then place it in a folder for your future projects.

Here's a wash I created using celery green. 


Look at the little animal figure someone drew.  Isn't that cute?  These particular music sheets I picked up from a thrift store so no telling who they originally belonged to.  I find the notes others make in books or like here on the music sheet, quite fascinating.  What were they thinking when they drew it and why?


Here's a sneak peek of what I'm working on.


I'm working on another video tutorial to show you how they're done.  I need to first complete the pieces I've been working on and get them in my Etsy account.  I'm working on a deadline ya know. 


Now, back to work. I hope your day is much drier than mine. It's been raining for two day snow and more cold on the way.  I'm not complaning though, it's Winter and I LOVE the cold and the rain together; makes you appreciate those perfect Fall and Spring days.  Luckily I'm cozy inside the house...with this:


He's perched on this window sill daily.  Eyeball the squirrels if you ask me.

Melanie