November 28, 2009

Holiday Vignette Part II

Now, let's move on to the mantel. First you must remove your clock, and making sure the lizard is WELL out of the area. I think he snuck in when I brought in some things from the shed.


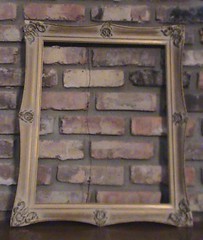
Start with an empty frame like this


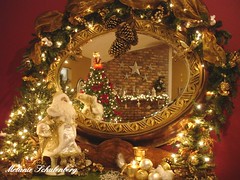
Grab your ornaments and some fabric and soon you can create this:


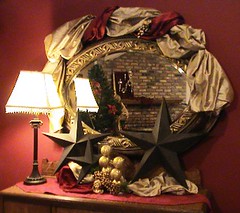
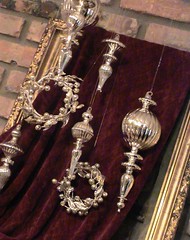
The silver ornaments were purchased last year at Z Gallerie's after Christmas Sale (1/2 off, possibly more). The largest ornament is approximately 8" long.  Pairing the shiny silver against the dark red of the fabric (which is a plush throw by the way) was the main goal.  They look so rich together; I  was determined to make it work.  Here's a view from a different angle.  Silver and Wine decor.

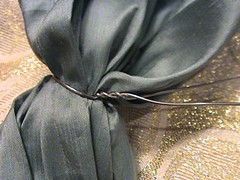
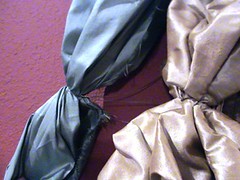
Old frames are a great resource for creating displays. You can find them everywhere, from garage sales to flea markets. The old frame above had a deteriorating canvas which I removed with a sharp blade. You can still see reminants of green canvas on the left side of the frame.  Once your canvas is up, drape your fabric over so it falls gracefully (with a few pins to secure it in place). 

This mantel is the most challenging to decorate. The brick fireplace above is on a skew, making one side of the wall higher than the other. I'll share a photo once everything is completed to show you exactly what I mean.

Here's another great purchase from Z Gallerie:


Isn't she lovely? Mercury glass with those delicious rhinestones on all four sides and an antique brass topper. This ornament is about the size of an orange.

I hope this little tidbit helps get your decorating juices flowing.  I'm taking a small break the rest of the weekend to just look at things to decide what I'm doing next.  Decorating is a progressive venture.  You need to step back and take a look at what you've done to figure out what you need.  Besides, I'm in some serious need of some paper crafting time.  I get withdrawals if I'm away to long from my crafting room.

Until next week, lat-uh gat-uhs!

Melanie

November 27, 2009

Holiday Vignette Part I

Now that you've all had a good nights sleep from that large Thanksgiving meal, it's time to get hopping on those Holiday decorations for your home.

I thought I'd share a bit of what I've been putting together this year in hopes it will give you some ideas for your own holiday decor.  Much of what I have learned is from trial and error and with help from a creative neighbor.  Check out her yearly "Christmas Village".


Each year I try to change my displays.  Then again, there is a comfort in repeating what you've previously done.  Here's a reminder of what my sideboard looked like in 2007:


Here it is this year.  I've got a bit more tweaking to do but it's coming along nicely.


I'm into the deep reds and golds this year.  Those large stars were purchased two years ago and the spouse has yet to put them up (permanently).  They tend to float from the house to the shed.  The rustic metal helps tone down the brassy golds. 

The top of the mirror is covered with silk fabric which I purchased during Hancock's 40% off fabric sale.  I use these fabrics often at the shows I vendor for.  Bulk fabric is one of the most cost effective ways to dress up any vignette you create.  Purchase the colors you love most and you'll soon be using them over and over.  The gold silk and blues you'll see below can be used again for Easter.

Here's how I attach the fabric to the mirror.  You'll need this list of supplies to get started: your fabric, wire cutters and medium weight wire.

Cut a piece of wire approximately 12" long.


Gather your fabric together where you'd like to start your first puff.  Try to fan fold the fabric near the gather so it creates larger mountains and valleys (it gives more interest).  Twist your wire around the fabric. Avoid twisting the wire to tightly, just enough to hold the fabric in place.  You'll have about 6" of wire left extending past the fabric.


Tuck the wire behind the mirror.  Our mirror is pretty snug against the wall so it helps support the wire.  If you're mirror, frame, etc. is further from your wall, consider using a longer piece of wire so it tucks further down behind the mirror.


Easy huh?  Don't limit yourself to just your mirrors and wall hangings.  Think about adding fabric to your light fixtures or the back of your chairs.  There are many options.  I'd love to see what you come up with.  Who knows, your creative touches could inspire all of us.

The mantel is next.  Wish me luck.  I've fallen off the ladder once already.

Melanie

November 26, 2009

Thanks and the day after

Well, it's Turkey day, 8am and the spouse tells me the turkey will be ready in an hour.  We have the option of eating turkey 9:30am this morning or let it sit a while and eat slightly warm at 11am.

My intutition tells me the bird isn't nearly done.  The spouse is mearly going on a visual exclaming; "the bird is brown on the outside; it's almost done".  Guess I'll have to intervene and check for myself after this post.

Thought I'd share what my focus has been on the past two days.  The attic has been emptied entirely of it's Christmas contents.  This is what the living room looked like two days ago:


What you can't see are the additional boxes in the foyer near the front door.  I've been working steadily trying to get the house-set up (boxes everywhere just screams danger when you have a 5 yo who likes to jump).

This is the first year I've ever set-up BEFORE Thanksgiving.  I'm thinking ahead.  We're empting the ENTIRE attic and getting rid of "stuff", so setting up early for the Christmas holiday is a must do.  By the end of today I'll have the place looking like Christmas (or as close to it as I can). 

Have a blessed and grateful Thanksgiving.

Melanie

November 24, 2009

Holiday Extravaganza


It's a Holiday Extravaganza!  Stock up on your paper crafting supplies.  Get 30% - 50% off.   Offer ends November 30th (while supplies last).

Make sure to take a look at the Whole Kit and Kaboodle starter kit.


Simply select on the images below to see a list of sale items.


November 22, 2009

Holiday Helper 2009 Starts TODAY


Holiday Helper 2009 starts TODAY!

Enjoy twelve consecutive days of the Holiday Helper delivered right to your inbox. The ideas are designed to help you with gift-giving, decorating and card making during this busy time of year.

The first issue has already been sent, a fun Holiday Organzier. To receive the remaining future issues, simply sign up HERE . You'll receive the next 11 copies each day after.
 
Melanie

November 19, 2009

Tour de Freaks ~ November

Time for another Tour de Freaks.  Remember, the tour officially starts on the 20th of each month, so stop by then in the morning to see it in full swing.

The theme for this month is altered art, stocking stuffers, gift and more.  Mostly 3D you see.

You probably just arrived from the fabulous blog of  Gretchen Barron

My first project is an altered wooden hanging plaque.  The base paper is from the Merry Moments designer series packet.  All other embellishments came from the Christmas Jingle Simple Scrappin pack.  Here's a suggestion if you try this yourself.  Use the beautiful papers in the Scrappin' pack instead of the Merry Moments.  I just happen to attach the paper before I thought of using the Scappin' kit.

I must have taken 30 photos of this and each came out blurry.  I finally opted to scan the plaque, which is the reason for the grey background color.


Here's a close-up of the details.  I used a gold zig pen to add color to the brown die cuts that came in the kit.  The center ornament you see here is actually the outside rim of where the green stripped ornament was held.  I adhered a peice of vanilla cardstock behind it after stamping the with a festive image (from the Pattern Pines set).  Additional gold dots with the Zig pen were added to the green stripes on the ornament and dots on the vanilla card stock and stamped image.


Here's the top of the plaque.  My large Bigz Scallop, Circle Cutter and Damask Texturz was used to create this embellishment.  Oh, and the Peace is from the Peace, Love, Joy and Cheer die.


Next up.  A plain white candle I picked up from a dollar store (the same place the plaque was purchased).  The candle had been sitting for a month (knowing I would eventually dress it up).  Who couldn't use a candle?


The paper once again is from the Christmas Jingle Scrappin' Kit.  The paper is adhered with sticky strip and the red paper going down the front  is a peel and stick border.  Quick and easy! 

The snowflakes are from the Patterned Pines set.  Emboss in gold on Vanilla card stock and stamp in Real Red on Vanilla card stock.  An additional stamped image and scallop punch finish it off nicely.

Here's a close-up.  The Joy once again is from the Peace, Love, Joy and Cheer die.


There you have it.   I hope these ideas help you to create some inspiring gifts and 3D items your self.

Next up on the hop is Connie Babbert.  I'm sure you can't wait to see what she has in store for you. 


Melanie

Maple leaf Roses

Gotta, gotta, GOTTA share this!  Surfing online at 4am I came across the most wonderful website.  House of Art.  An array of hand-made goodies simple enough for even the most inexperienced crafter to try.

Digging through the archives I found this beautiful Maple leaf Rose arrangement. 


Did you know that such a thing existed?  They're beautiful.  So, guess what I'm doing today? Yep, I'm going to try and make one of these beauties myself.   Not sure if I'm doing an entire bouquet; that may depend on how the first rose develops.  Even a single mapleleaf rose look lovely if displayed properly. 

If you're up to trying your hand at this, you can find a tutorial HERE.

Be sure to check out the current page of the site "House of Art".  There are some fun crafting projects you may be interested in trying.  Looking forward to getting the kids to school to so I can get started. 

Have a creative day!

Melanie

November 18, 2009

The simple things

I'd like a show of hands of how many of you have more than 5 items on your daily list of "things to-do"?  If this is you, then I would like to request you cross off all but three.  That's right.  You are to select only three things you'd like to achieve today and get them done.

I'm have grown to dis-like my to-do list.  What once was a challenge has become one big stress ball of ink on paper.  No more. Why?  It's simple really.

While I'm busy running errands and checking-off that list, I'm missing out on the simple things each day.  The things that I love most, like being outdoors in the fresh air and watching/listening to things in the backyard.  It's important to get things done, but it's just as equally important to ENJOY your day.

This all came into the light when I walked out to the yard the other day and noticed my Camelia bush blooming.  I've been so busy doing my list, I missed that it was in full bloom.  Isn't she beautiful?


Here are some green lacewing eggs on the underside of a leaf.   I'm always excited when I find these eggs, because the green lacewing bug eats pesky bugs.


Here she is  full length.  There is Jack, right in the middle of my flower bed.  Oh, no flowers you say?  Well, no there isn't, that's because Jack can not tell the difference between grass and a flower bed.


Not to outshine Ms. Camelia, but here is another lovely bush, or rather small tree.  It's my Sweet Olive.


While this is not as showy as the Camelia, it makes up for it with the sweet smell of it's flowers.  Again, , something I would have missed if I hadn't taken the time to just stop and walk outside.

Once I held a yard sale and while this Sweet Olive was in bloom.  Several visitors commented on how lovely the scent was.


I'm just saying, fit in those simple things that make you happy.  Whether it's reading 3 chapters of a book, or baking cookies, maybe just sitting in the park listening to the birds.  It doesn't have to be all day, maybe just an hour.  You'd be amazed at what that one hour can do for your spirit.

I can't go until I share a little art with you.  Here are some extra personalized note cards I created for the market last week.  I have a few left.  They'll be up on Esty soon.   If you're interested in purchasing these as a gift (great for the upcoming holiday); simply email me with the monogram you'd like on your box.


You can find the listing HERE.

Melanie

November 17, 2009

Holiday Helper 2009

It's heeeeeeeeere!  The 2009 Holiday Helper.


Let’s face it, the holidays seem to appear earlier every year. They also have the uncanny knack of showing up when we are at our busiest. We have holiday gatherings and parties. We have places to go with the kids. Presents that need to be bought. So many things that just have to be done.

Wouldn’t it be nice to have creative ideas delivered to your inbox, 12 days full of great holiday help? These ideas will cover gift giving, decorating and card making. They will be packed full of inspiring ideas. Just when you need the inspiration and the ease of great projects I'm available to you, ready to help you though the busiest time of the year.

The holidays are a time of sparkle and wonder. Handmade gifts and decorating add to that in a way that is uniquely your own. Having inspiration for great projects, that are simple and easy to do, can be a jumping off point that will spark your creativity. Adding that little bit of your own personal touches to decoration, cards and gifts really does show that you care enough to go that extra step.

Sign up for the 12-day Holiday Helper, to be delivered to your inbox every morning starting November 22nd.  Just add your name and your primary email address to the "Sign Up for Inspiration" box on the left of thsi site and click submit. I'm here to help you add that sparkle and glitter to your Holidays!

Please contact me if you have any questions

Melanie

November 16, 2009

Butterfly Girl

What an exciting weekend!  Saturday was an all day vendor event at the Market (I started from 6:30am and finished up at 6:00pm).  Seemed like there was much more room this year than last.  It was a long day though and I was ready to head home.

We had one exciting Sunday.  After heading home from church we saw a deer jumping the fence near the field on the way home.   We live in well developed subdivision, lots of houses, so you NEVER see something like deer.  Luckily I had my video camera in the car (take it almost everywhere).  We didn't get to close, I was scared it would hit the car.


Moving on to the art world.  I've been busy creating some more mixed media, collage art.  Here's my latest.


The background canvas was prepared a month ago.  Last week I finally decided to add something to it and walla!  It could possibly use words but I thought it might take away from the image. 

I'm off to start the day, lots of errands and cleaning.  You know how Mondays are. 

Don't forget, this Friday Tour de Freaks will be up and running.  Make sure you stop by and take a peek at all our lovlies.  This month we're working on stocking stuffers, gift items and alter art.  All my favorites!

Have a great day everyone.

Melanie

November 11, 2009

Mistletoe Market Baton Rouge

Mistletoe Market is this weekend in downtown Baton Rouge.  I've been busy preparing my goods for sale, setting up my display (practice ya know).  I'm almost there.

I wanted to share with you some of the things I've been working on.  First up, personalized notecards with box.  These are the very same notecards I will be offering in my Seasonal Smiley's online workshop available November 17th.

As you can see, I've stamped several fleur images which will be part of the medallion on each of the notecards contained in the box. 


Do you stamp/embellish your envelopes?  I think many overlook that poor little envy, but it adds so much to the completed project.  Here I've stamped the back flaps, but you could certainly stamp the front corner.


Boxes in the making.


Here are my finished lovelies.  They'll travel to the show with me like this.  The final embellishment (the monogram) won't be added until the buyer decides on what they'd like (that's why they're "Personalized" notecards).


OK, I must get back to work.  Just two more days till the big show.  If you're in the area, be sure to stop by the Sheraton Atrium and say "Hello" at the Stampin' Up! booth.  I'll be on the main floor room, booth #24 near the stage (second booth). 

November 8, 2009

LSU Girly Collage

Next weekend I'll be participating in an upcoming holiday show here in Baton Rouge.  It's Mistletoe Market.  A holiday shopping extravaganza.  Over 100 vendors selling anything from hand-made, home decor, food and more.

I've participated in the event for several years and this year I'm mixing things up a bit.  From a demo's point of view, most of those attending the event are interested in purchasing Holiday gifts, not ordering them.  Thus the reason I've been occupied for the past few weeks.  Well, that and I've been under the weather.  Had to cancel my trip to New Orleans for a workshop which is highly taboo for demos.  Just didn't think it was wise to drive while taking sleep inducing medicines.

This year I'll be offering a few of my "Seasonal Smiley's" at the event and some personalized hand-stamped mixed media art.  I've been having so much fun working on canvas's.

Here's my latest:


I wish you could see the background more clearly.  I think it came out wonderful!  The dark purples and golds are so rich on the canvas.  This is the original but I'll be selling prints at the event.  I'll have a few available on Etsy as well (hopefully the printer services I'm using will have them in a timely manner).

Anyone notice Spell check is gone from blogger, or am I just overlooking it?  Be prepared, I am the worlds worst speller.  OK...back to getting my things together for the big weekend.

Enjoy your week.  I'll post again on Tuesday with an update.

Melanie

November 6, 2009

Jumbo Paper Clip Tutorial

Well, I'm a couple of hours late with the tutorial but that's because I accidentally deleted it yesterday. That was probably due to to much Sudafed.

Before I post it, I'm curious if anyone who received my post yesterday had text going through photo?  Everything looked hunky dorie on the preview, but not when it arrived to my inbox.


So, here's your tutorial.  I'm making these for an upcoming Holiday Shopping event I participate in next week.  I made them last year (slightly different design) and they were a hit!  This tutorial is included in my "Seaonal Smiley and Gift Packages" online workshop that begins the 17th of this month.  Enjoy!


Jumbo Paper Clips from Melanie Schulenberg on Vimeo.
This is a great Smiley project, especially for teens. All you need is paper, jumbo paper clips (office supply) and stamps.

November 5, 2009

Altering a Serene Snowflake

I'm here guys.  I've been filming another project to add to your "Smiley" gift-list.  It should be up by lunch tomorrow so make sure you check back.  You can view it on my Vimeo account so you can view it there as well.  It's approxmiately 25 minutes so grab your beverage of choice and sit back to enjoy.

Until then, here's something I posted to PocketsofInspiration.NING. earlier this week.  It's an idea for extending the use of your Snowflake stamp set (the one I used was Serene Snowflake).  Both cards shown here were created for swaps.  I favor the top bottom left.  The cosmo glitter I added really makes the image pop; kind of the star of the card.  It's a simple design, but it didn't need much, that snowflake is the main showcase.


OK, I'm off to finish editing the video for tomorrow.  I'm headed to New Orleans late afternoon so I will plan to post it before then.

The tutorial is a Jumbo paper Clip.  The idea has been around for some time, just thought I'd share the how-to's for those who aren't familiar with it. 

Until tomorrow.

Melanie

November 1, 2009

Seasonal Smiley's and Gift Packages

Bad weather Saturday in the wee early hours shorted something in our computer. Nothing like a panic attack when you're up at 5am.

I rely heavily on the computer and the last thing I need is to have this baby go dead on me. It's not so much what was 'on' the computer (we have an external backup source), but the fact that I couldn't get online. Have you ever waken up wanting to check our your favorite sites and not be able to?

Luckily the husband figured out the source of the problem and headed to the computer store to get what we needed.

Now on to some crafting news! It's time for another "Seasonal Smileys" workshop. This year a Gift Packaging ideas will be included.

The basis of this workshop is to share ideas for creating small, inexpensive gift ideas. What could be better than a crafter being crafty during the season of giving? It's an extra special treat for everyone.

You can get a glimpse of a few projects in the collage below. There's a captured butterfly mini-ornament, and a personalized note card box using the Extreme Elements stamp set.


This years event will be held at Sweet Wishes. Contact me for more information.

Can't attend the local event? Don't fret. Sign up for the "online workshop" starting November 17th.

The online workshop cost is $27.00 and includes video for constructing all projects along with a PDF for supplies. Once registration is received, your personal invitation is sent to PocketsOfInspiration.NING.com where you can view your classes.