
Now that you've all had a good nights sleep from that large Thanksgiving meal, it's time to get hopping on those Holiday decorations for your home.
I thought I'd share a bit of what I've been putting together this year in hopes it will give you some ideas for your own holiday decor. Much of what I have learned is from trial and error and with help from a creative neighbor. Check out her yearly "Christmas Village".

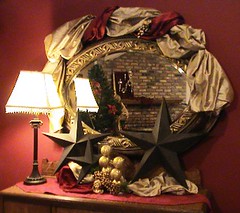
Each year I try to change my displays. Then again, there is a comfort in repeating what you've previously done. Here's a reminder of what my sideboard looked like in 2007:
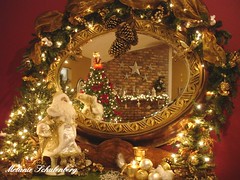
Here it is this year. I've got a bit more tweaking to do but it's coming along nicely.
I'm into the deep reds and golds this year. Those large stars were purchased two years ago and the spouse has yet to put them up (permanently). They tend to float from the house to the shed. The rustic metal helps tone down the brassy golds.
The top of the mirror is covered with silk fabric which I purchased during Hancock's 40% off fabric sale. I use these fabrics often at the shows I vendor for. Bulk fabric is one of the most cost effective ways to dress up any vignette you create. Purchase the colors you love most and you'll soon be using them over and over. The gold silk and blues you'll see below can be used again for Easter.
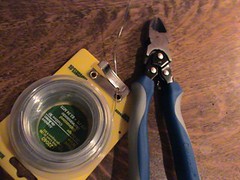
Here's how I attach the fabric to the mirror. You'll need this list of supplies to get started: your fabric, wire cutters and medium weight wire.
Cut a piece of wire approximately 12" long.
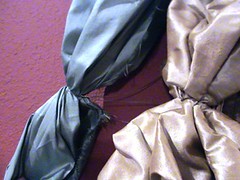
Gather your fabric together where you'd like to start your first puff. Try to fan fold the fabric near the gather so it creates larger mountains and valleys (it gives more interest). Twist your wire around the fabric. Avoid twisting the wire to tightly, just enough to hold the fabric in place. You'll have about 6" of wire left extending past the fabric.
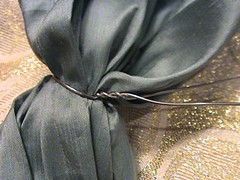
Tuck the wire behind the mirror. Our mirror is pretty snug against the wall so it helps support the wire. If you're mirror, frame, etc. is further from your wall, consider using a longer piece of wire so it tucks further down behind the mirror.
Easy huh? Don't limit yourself to just your mirrors and wall hangings. Think about adding fabric to your light fixtures or the back of your chairs. There are many options. I'd love to see what you come up with. Who knows, your creative touches could inspire all of us.
The mantel is next. Wish me luck. I've fallen off the ladder once already.
Melanie
11 comments:
wow I want to come to your house, it's gorgeous!!!
I LOVE your Christmas Village tree! May I ask what you used for the plat form around the tree? We don't have a lot of room in our house to display our villages so we haven't been able to bring them out in the past couple of years. This idea is perfect!!
Hi Jan. Thanks for your comment. The tree stand is made of simple round plywood circles with legs attached. They are just stacked on top of one another to get a tiered effect.
I absolutely love this tree i inherited my husbands grandmas village and was not sure what to do with them until i saw this is there anyway i can find out exactly what you did is it in your book?
Could you please provide, More information on how to make the tree base? It looks like you placed it around a christmas tree????????
I love this idea. I have around 70-75 pieces plus a train. This is definitely a 2015 Christmas project. I probably add just one smaller layer at the top and put a church there as the "tree topper".
I also love this idea.. how did you stack the levels... and is there a dowel in the middle of all or just stacked? I would love to do it this year... also what are the dimensions of each thank you so much for any help
I also love this idea. could you please give us a little more info.. is there a dowel in the middle of all to stabilize it? what are your demensions on each and how did you stack them... thank you so much I would love to do this, this year...
Would you please share the dimensions of the Village tree display? I would love to build something like that for my mother but am having a hard time with dimensions.
BUILDING YOUR CHRISTMAS VILLAGE BASE:
For those inquiring about creating something similar for your own Christmas village.
Each of these levels are created by stacking tables made from plywood and 2 x 4 supports. Start the base level at a size that will best fit in the specific location in your home.
The base shown in the photo starts at approximately 5' in diameter, with each next level approximately 1' left in diameter (5', 4', 3' & 2') and 2' high between each level.
The base left will be closest to the ground so the legs of the table should be approx. 4" high. Each of the 3 consecutive levels should be approximately 6" higher than your TALLEST VILLAGE PIECE. This is so you have the freedom to change the level you display your tallest village piece from year to year.
The legs on each level are covered by green garland (clipped to fit) and of course, polyfil is used to create the snow on each level.
The very top of the display has an artificial tree.
I hope this helps those who are interested in recreating this yourself.
Just found this on Pinterest. I have at least 14 villages and some single houses. Can you tell how many houses would fit? Your tree looks like it has bigger houses on it. Where are all the cords?
Post a Comment