May 31, 2009

Butterfly Bath Tube

Here's a project the Metairie Stamp Club created last weekend. It's a test-tube filled with Vaseline bath beads (Peach scented). Great gift idea don't cha think?


Basic supplies:
Test-tubes were purchased online.

The idea came from Lori Ruello, a fellow demonstrator. I modified it just a bit to suit my own needs.

Thanks for stopping by.

Melanie

May 29, 2009

Tour de Freaks


Get ready for an all out inspirational Blog Tour! I and several other members of the "Control Freaks Swap Group" will be participating in a one of a kind Blog Tour. This is not ordinary tour. Each member of the Control Freaks Group have remarkable design talents and now for the first time, you'll get to see some of their FABULOUS creations.

Tour de Freaks will be viewable the 20th of every month. Our kick-off month will June 20th and projects will showcase the "Last Chance Items" in the Stampin' Up! catalog.

Here's a listing of the talented staff for the upcoming June tour:

Connie Babbert, Gretchen Barron, Patty Bennett, Mary Brown, Julie Dinn, Cindy Major, Lisa Martz, Dawn Olchefske, Melanie Schulenberg (that's me), Janine Tinklenberg, Shona Watson and Wendy Weixler!


Make sure you mark your calendar and set a reminder on your phone for June 20th, you won't want to miss this!


Melanie

May 28, 2009

Crafting for Everyone

Between printing resumes and filling out applications, I've been taking time to create (so have the children).

First up, we have "Recession Kid Crafts". Before the Wii, DS, Nintendo and other electronic devices children used their imagination for play. Give them (or in this case, let them take) a few supplies around the house and let them make their own toys.

Here, the children skillful applied aluminum foil and masking take to make "Fridge Art" (which also doubled as weapons two hours prior to the fridge display). Missed the photo of the hand grenade; I think it found it's way over the back fence.


Personally (from a Mother's point of view), this looks just as good as some "quality" sculptures I've seen.

You should also note, aluminum foil can also be used to make wrist/arm-bands to create an "Iron man" effect. Those looking for "Halloween costumes - Recession style", make sure you tell everyone you heard it here first!!! Unfortunately I didn't get a photo before the Iron man child was disassembled.

For all of you wondering what to do with the kids this year (craft-wise), let them loose in the house and see what they come up with. Come back and share your photos! It'll be interesting to see what others can create.

Now, on to the adult crafts. Here's what I've been working on. After months (OK, over a year...many years), I buckled down and created my very own mixed media canvas collage. Acrylics, oils, paper, seed beads and more. It was fun (slightly intimidating). It's not finished, just wanted to share before the final touches.


Inspiration for this came from many, many resources. One that was a real influence was Audrey Eclectic. She does the most BEAUTIFUL work (and luckily 4 of her art pieces reside in my very home).

OK, enough computer time. Must get back to business at hand.

May 25, 2009

Tulipe Vinyl Tutorial

Here's a "Tulipe Vinyl Tutorial" demonstrating the use of vinyl cling with the Tulipe Bigz diecut available from Stampin' Up! ©. The tutorial is a series of photos and narration explaining how the vinyl cling was applied to the "Decorative Fleur Plaque". While the sample shows the vinyl cling applied to wood, glass, cardstock and tiles are just a few more items useful for this application.


"Tulipe Vinyl Tutorial" $5 and is sent in .wmv format.


The "Decorative Fleur Plaque" shown above and below is also available for purchase for those who are interesting in adding a charming plaque to their home or as a gift to your significant other for upcoming father's day. The Decorative Fleur Plaque is available for $12.00 ($3 S&H not included). Each plaque was individually hand-crafted, painted with acrylics, oils, wired and sealed all. The cream colored dots were added one by one achieving an old folk art effect.


Plaque measurements are 5" x 7". There are only 10 plaques availalbe currently. Please remember that each of these are hand-crafted and the colors of the oil paint and acrylics will vary slightly with each (some lighter, some darker) which only adds to their appeal and orginality.


May 24, 2009

Stamp Club Projects

A view of the two projects the Metairie club completed this past weekend. There was another, unfortunately a photo wasn't taken of it (yet).

Tomorrow will be a day of creating (that's what the goal is).


May 19, 2009

Crafting on Canvas

Have you ever made a to-do list that just seemed to grow and grow? Well, there are several lying around here, partly because when an idea hits it's jotted down so it's not forgotten. Problem is, we're so busy with the 'everyday' that doing a to-do list comes second.

Two weeks ago I was given the boot (laid off). It was bittersweet really, losing a job is never good but at the same time it relieves you of office duties to catch up on things that have gotten away from you (like your ever growing to-do list). Thus began the completion of a baby canvas that was started weeks (OK, months) ago.

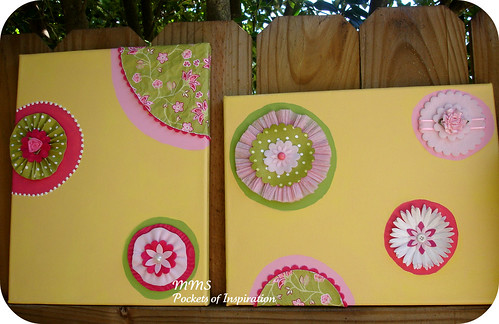
Below is the finish product. It came out nice (I think). Kind of plain really, but the pattern to the baby's room was really simple, so this worked out well. The main canvas was painted with acrylic and then embellished with felt scallops and daisies using dies, fleece, crepe paper, buttons and various odds and ends around the house. This was so much fun to make!


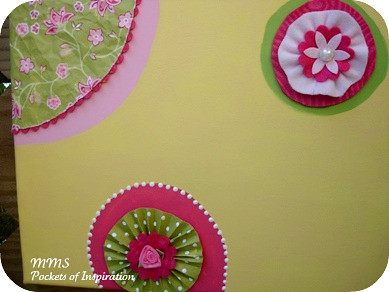
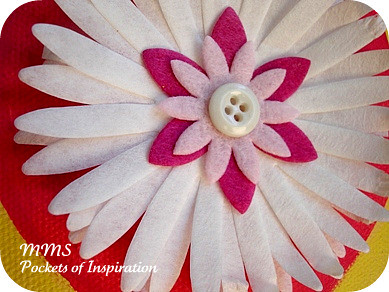
Here's a close-up of one canvas (view the other canvas by selecting this Flickr link or on the right side of this blog).

The left corner of this canvas uses "Raspberry Tart" designer paper by Stampin' Up! It really was the perfect compliment to this piece given the colors being used. The pink flower on the bottom left was originally from my daughters ballerina dress when she was two years old (she's almost 13 now). Just goes to show that all the 'stuff' we gather can be put to use, eventually.


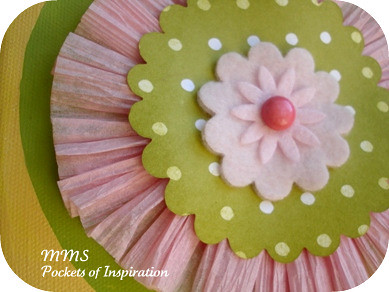
Making this pink crepe ruffle was so much fun! Really gives the canvas some girl frillies.


The daisy below was created using a coffee filter. Yep. Got the idea from Ms. Pam Garrison herself! That lady has some AWESOME ideas. Pam used filters to make a garland, but I thought this was just another great way to utilize them. Using tissue paper to make this flower just didn't seem to keep it as stiff as the coffee filter did; it holds up better.


This little pink fleece add-on was the most difficult. All other embellishments were added to the canvas except for the one light pink spot that remained. Mixing fuchsia and the pink was the first option, 4 days, this was the final decision. The softness is wonderful, kinds of tones down the other loud colors (it is going in a nursery afterall).


So, do you think they'll enjoy it as much as I have creating it?

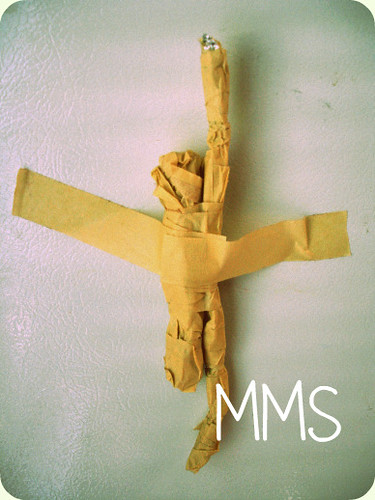
Here is the final product of the Rubbapalooza Spring Soiree. Everyone seemed to create them easely and in their own style. The daisy-like flower below was made with an everyday household item. Any ideas what it is?? If you guessed Coffee Filter then you're definitely on the creative track. It's simply a layering of mulitple daisies from the die mentioned above. The branches and bird were created with THIS die and the main background was created with a napkin and applying gel medium. The options are endless using a technique like this.


Thanks for taking the time to look. Enjoy your Tuesday.

Melanie

May 15, 2009

Spring Soiree one day away.

Well, the weekend has finally arrived for the Rubbapalooza Spring Soiree. It's taken lots of planning and I'm sure those registered are going to enjoy creating the Blossoms Tapestry awaiting them.

I'm off to take care of the final preparation. First thing is to prepare the fruit tart. Take a look at these juicy blackberries that will add to the yummiest factor of the fresh fruit tart.


Below are a few more sweets for the special event made by yours truly. If you ever wonder why petite fours cost so much at the bakeries, the images below will answer your question. Each one of these cakes must be hand-dipped into fondant. It's quite messy, but product that results is a sweet sensation.

The original desire to create these cakes were for a few friends, but things didn't pan out delivering them so they were saved for tomorrows event. Roses were added (because roses and petite fours just make them more delectable). I kind of went wild wiht the piping and started making crazy designs.

Below you can see my feeble attempt to make a baby head with a small curl on top, but it looks more like a tele-tubby. The dress, well, that's NOT the figure you'll get if you eat more than 6 of these. STAP was supposed to spell "Stamp" but, I jumped ahead and put a "P" instead of an "M". Maybe I should eat this before the event so there aren't questions as to what it means, LOL!


Now it's time to finish bagging goodies and setting up tables. Here's to a fun and creative weekend.

May 7, 2009

1st Communion

Thought I'd share the only good photo taken at our oldest son's first communion. Sitting near the steps outside of church.

May 5, 2009

Rubbapalooza Spring Soiree

Well, I've completed designing my project for my upcoming Spring Soiree. The colors, textures and embellishments are so, pretty, feminine. If I had planned it sooner it would have made a great gift for Mother's Day. Here's a sneak peek:


and another....


Now, to finish up that baby gift I've been working on.

Melanie