January 30, 2010

Save the butterflies

Do you salvage pretty paper images?  I do.  My sources range from gift bags, tags on clothing, including labels on packages.

Envision those pretty French soaps and dainty tea packages.  Companies spend a great deal of time and money creating packaging and labels for their products; after all, it is often what draws you to the item.

Enter designer scrapbook paper.  Printed paper offering colorful images and detailed graphics.  Scrapbook paper can be used in almost every type of artwork; scrapbooking, card-making or for covering the worn surface of a wood box.

Many times the graphics are so beautiful, we hesitate cutting into them.  That feeling surfaced as I pulled a from my new Sweet Pea designer series paper that showcased colorful butterflies.  What could I use the paper for without having to cut into those lovely winged beauties.

In an effort to spare these beautful butterflies from the blade of a paper cutter, I created one super-sized card.


This card measures 8 1/2" x 5 1/4".  It is a full sheet of banana cardstock folded in half. 

All but two butterflies weren't included in the original paper layer.  They were instead, cut seperately and reattach the to the card in strategic places (the top left and far right of the card).  The wings were curled to give it more of a 3D effect.  The smallest butterfly was lifted with a dimensional.

There are 48 patterns in the Sweet Pea DSP.  I'll be going through the rest of the pack trying to save the remaining butterflies and dainty flowers.  Afterwards, I'll move on to those fun geometric shapes for a different kind of project.

In the meantime, here's a little sneak peek of what's in store for the Februray issue of Paper Crafters Sampler


I hope your day is filled with sunshine and inspiration.

January 28, 2010

An outing with friends

I decided to take some time out to enjoy my day (and the amazing weather) with some friends.  It's been quite some time since I've seen them so we met up for some lunch 'em.  It was refreshing to just sit and chat.

We dined Al Fresco to take advantage of the warm sunshine.  Our eaterie of choice was the California Pizza Kitchen in the beautiful shopping streets of Perkins Rowe.  I've never been to CPK before and it wasn't dissappointing.  Here was my entree of choice.


It's an eggplant, goat cheese and sweet pepper pizza.  Just looking at it makes my mouth water.  It was delish-e-oso!  I ate the WHOLE thing (well, all but one piece I shared with a friend).

Here's a shot of our view. 


It was a fun and relaxing afternoon.  Having a break from the house (cleaning and crafting) was very well deserved.  Being home is great, but I sure miss the regular conversations with my co-workers.

I'm back at the homestead tweaking the February issue of the Paper Crafters Sampler.   The design team was given the theme of Easter.  This month's issue is titled "Baskets, Bunnies and Bonnets"; that'll give you a little hint of what you can expect to see inside.


I've spent the day photographing my projects with Da Beast (Jack).  Here he is sunning on the driveway.  Taking a break from chasing squirrels.


Well, it's time to head off to carpool.   I'm working on something special for all you Mardi Gras fans. 

I hope your day is filled with creativity and inspiration.

Melanie

January 23, 2010

ARTistic Paper Crafting ~ A Passion

I've a busy Saturday ahead, so this will be a short post. Well, it's one of those inner you post and may wind up longer than expected. I'm going to insert images randomly thoughout which I hope will keep you with me until the very end. Images like this one:


Two years ago I attended an event (for women) that helped you find your inner passion. Passion, as in, "what is your true passion". What lifts your spirits and makes you smile?

In a nutshell, the lecturers had you list 10 things that made ME happy.  It could be anything.  Each participants list varied to include things such as:  family, walks in the park, reading a book, fishing, travel, antiquing, sunshine, morning coffee shop chats, losing weight, etc. 

Once lists were compiled, you were paired with a partner who through process of elimination had you cross off the items on your list and you were left with your passion.


It was no surprise to me that paper crafting was at the top of my list.  It felt kind of guilty.  Remember, some of the things on my list were VERY important; obviously my family and the things we shared.

Paper Crafting??  I kept looking at my answer.  How terrible of me to have paper crafting at the top of my list above my family.

I wasn't alone.  As others neared completion, they were just as surprised of what topped their list.  For some it was travel, others boating, others walks in the wood or simply having time to sit in the bookstore reading a book. 


Now, you're probably thinking we were a bunch of self-centered women.  Listening to the lectures they explained why our answers were the furthest from what we expected. 

Let's remember, women are the wearers of many hats.  We over-commit, say yes when we want to say "No".  With so many obligations and duties to others, it is easy to understand why we forget what we love and who we are.


I keep looking at my list to find a way to push paper crafting to the bottom so my family could sore to the top.  Nothing worked.  Regardless of how I manipulated my first few answers, paper crafting would top the list.

After a few minutes I just had to come to grips with my answer.  I am a paper crafter.  It's that simple.  Paper in any form whether it's, cardstock, newspaper, old books, greeting cards.  An empty journal at the art store with it's creamy colored paper and fresh smell, beckoning for that first pencil strike. 

Paper crafting for me is relaxing, intense, allows me to express myself.  Transforming a simple sheet of paper into a work of Art gives me an unbelievable sense of satisfaction and fulfillment.  It's my happy place, my refuge. 


We all need something, whether it be a place, image or craft to allow us to escape.  Something that allows you to relax, wind-down and revive yourself.  A time out from the daily or monthly chores, schedules in our lives that drain our spirits and our energies until we're completed exhausted.

That place, image or craft is your Passion.  It's your wind down.  It's what will without a doubt revive your inner-self.  It can be planting the first spring seed for a gardener, creating the ultimate savory souffle for a chef, of sitting on a park bench listening to birds for others.


How can a paper crafting passion be more important than my family?  The answer is simple.  No one wants a mom, wife or friend who is frustrated, angry or has pent-up emotions. A bomb-waiting to go off.  Having that down-time allows me a breather.  I can release all those things for a short period of time and do something for 'me'.  It's not selfish at all.  It's like taking a mini-vacation.  It allows me to appreciate my family that much more.  When I'm refreshed, it reflects in those around me.

Again, as women, you owe it to yourself to find YOUR inner Passion.  Find the thing that will calm you, ignite, refresh you.  It's your happy place.

There are lots of resources for finding your passion online.  I believe the lectureres used something called "The Passion Test".  They were licensed of course, but I think the freebie test online will suffice for those who want to try it out.  Remember first and foremost, you MUST be honest with yourself.

I hope you guys enjoyed the images I've shared.  They're the reason for my post.  Amazing paper art creations.  You can find more of these jaw-dropping paper creations from various artist at this link:  Extraordinary examples of paper art.

I'm drawn to the samples which use the newsprint and books.  You gotta love recycled art.  I'm seriously thinking of trying my hand at the Brain Dettmer books.  He's my fav.

Now, I must get on with my Saturday.  I've a big list of things to do.  I's 75 degrees outside on this January day.  Time to get some sunshine.

Big thanks to Carol G. for sharing the link with me.

Melanie

January 19, 2010

Tour de Freaks ~ Sweet Valentine


It's time for another Tour de Freaks. It seems like forever since we've had a hop being that we took a little break during December. We're refreshed and back at it.


This month we're celebrating Valentine's Day and have some fabulous projects to help you get your creative juices flowing.   If you've been following the "next stop" links you've probably just come from the amazing Gretchen Barron's blog.  Her projects are always so creative.

This month, I've created two projects for you.  First up, my EXTRA LARGE "hugs" card.  I say extra large because it was created from a full sheet of cardstock (shaving a 1/4" off both the top and side).  You'll need this extra large card to fit the jumbo sticky cuts letters.

For those not familiar with sticky cuts letters, the back peels off so you can stick the letters directly to paper.  Once down, simply peel the top layer off, revealing the sticky ahdesive underneath.  These sticky alphabet are great for adhering the chunky Essentials Glitter, seed beads or microbeads.

You'll see two new products offered by Stampin' Up! in my sample.  The Scallop Trim border punch (from the Sale-a-braiton catalog) and the small heart punch in the new Occasions Mini catalg.

To recreate the layers for the hanging heart, start with the Three Hearts punch, next the small heart punch, finishing with the smallest heart from the Three Hearts punch.  The white line was created with a signa-gel pen.


The hearts shown in the sample below were created with the small heart punch.  The Multi-purpose adhesive works well to hold the glitter on these small hearts.


A closer look at that tri-layer heart.


Next we have pretty floral Valentine card.  What do you think of that beautiful pink satin ribbon?  Another newbie item from the Occasions Mini.  There's something about silk ribbons used on cards that give them such an elegant feel.

The Valentine stamp is the "Hostess Best" set.  There are flowers on this stamp, but I simply colored the rubber image that I wanted to include (this technique is called omitting).  I went a step further by stamping the "V" in red, cutting it out and mounted it with dimensionals on the card.  Used my Three Hearts punch to create a little pink heart to tuck inside the "V".  The paper is the scrumptious Sending Love designer series paper.


Here's a closer look at that tiny little heart.


I hope you enjoyed my Valentine creations this month.  Next up is the oh so talented Connie Babbert.  She's got some spectacular projects to share.

January 14, 2010

Hearts on a String

Well, I've been away, AGAIN.  Let me explain:

Christmas Eve I picked up my 5 yo son at 3am to reposition him in the bed because as a mother I didn't think he looked comfotable the way he was (hanging slightly off the bed).

As I proceeded to lift 50lbs of dead weight I heard a series of noises that sounded like bubble wrap popping and spaghetti breaking in half.  Woke up with a sore back, which progressed the following week to a "OMG I can't walk". 

After two weeks of severe pain I opted for back surgery, something I never thought I'd ever do; especially after only having back pain for two weeks.  The rule of thumb for back pain is: go on meds, get shots, if that doesn't work find some other meds and more shots.  Do this for at least several months

I'd like to state for the record, if any man asks you what child birth feels like....tell him "very similar to a ruputured a disc".  It is in fact, if not almost identical as contractions.  Only difference is, labor last for A day, this pain goes on FOREVER.

In the O.R. and out again I feel as good as new.   The only orders I have are to take it easy. 

Dat's da scoop.  Seems I should have mentioned it earlier and I wouldn't have members fleeing from the inspiration hot spot.  Sadly, sitting only intensified my pain, so I was spending limited time on the electronic beast myself.  

Time to get back on track.  Let's start with something fun.  If there's one thing about having to lay low, it's being able to knock out some of those paper crafting ideas I've been piling up.  Here's my latest.  I'll let you take a looksie at the images, leaving the supply list for last.


Look at those sorry brown dash-dots on the scallop edge.  To much coffee if ya ask me!


Wanna make one of these for yourself?  Here's what you need.  Before I list supplies, I want you to look at your rubberstamps and try to incorporate what you have.  I've combined several stamp sets to make this and that's simply because I had them on hand.  Don't feel that you need to purchase every item I've used here to create this.  Make it your own.  Use what you have on hand.  If you don't have the Hearts to Heart punch, then use paper hearts instead.  Learning how to substitute pieces to projects will only extend the use of products you have on hand (and you'll thank me for it later).

Supplies: (and this is rough draft only)
  • Petal Card Bigz (this is for the main card...THIS ya need)
  • Sending Love designer series paper (Occasions Mini)
  • Scalloped heart of hearts (Occasions Mini)
  • Small heart punch (Occasions Mini)
  • Heart to Heart punch
  • Boho punch
  • Scallop edge punch
  • buttons
  • Birds and Blooms sizzlit
  • Simply Said Stamp set
  • Best Wishes and More stamp set
  • Be  Mine stamp set
  • Scallop border punch (from SAB mini)
  • Paper piercer
  • Pink and Chocolate marker
  • Cotton string (it hangs more freely than linen and hemp).  I used DMC floss for the chocolat hearts.
  • Modern label punch
  • Large Heart punch
That's about the gist of it.  The first step is adhering your large Petal Card hearts together.  Cut off two of the flaps from the petal card and it makes the heart.  You'll need to cut four of these and make hearts from them.  Attach the right side of one heart to the left side of another heart, and continue until all four are connected.  Punch a hole in the top and that's were you'll add your string for hanging. 

Tie a knot between each embellishment you add to the top of the string; this will prevent the items from falling on top of each other; keeping them seperated.

Be creative when designing the inside of the four hearts.  Add more words, more hearts, whatever you like.  Use my images to help guide you.   Any questions, just email!

Stampin' Smiles.

Melanie

January 10, 2010

Easter Blessings

Thought I'd fit in a quick post on this beautiful Sunday afternoon we're having (even though it's in the 40's outside).  Here's a card I created using the new "Abundant Hope" clear mount stamp set from SU!. 


Here's a brief how-to:

Stamp your main image in Basic Brown (because it gives a softer feeling than using stark black).  Use your Watercolor Crayons to color in your Daffodil and leaves.   Using your Signa-gel pen, go over the brown lines on the flower petals.

The butterfly was stamped in Cameo Coral ink and stamped off once using the new "Butterfly Accent" stamp.  Once you stamp off once, turn your butterfly stamp over, ink up the Very Vintage wheel in Basic Brown ink and  roll it over the butterfly stamp.  This is similar to the kissing technique, except we're using a wheel instead of another stamp set.  It allows you to add texture to a solid stamp image like the butterfly.  It's a great technique. 

The second layer of the butterfly is simply the Beautiful Butterfly Bigz.

So, there you have it.  I told you this would be quick.  Enjoy the rest of your weekend. 

January 7, 2010

Felt Fabric Confections

Just TWO MORE DAYS until the premiere issue of Paper Crafters Sampler goes live!  You'd think with a big launch like that I wouldn't have time for much more.

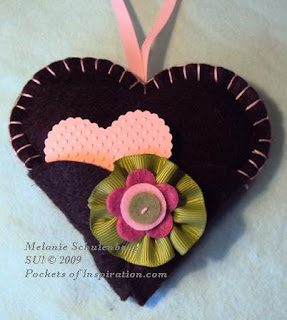
Introducing my Felt Fabric Confections.  Isn't this an A-dorable felt heart adornment?   Layers of creamy white fleece and soft sky blue flannel, sandwiched between two dark chocolate chip felt covers.   This layered heart reminds me of those big coconut layered candy bars.  Do you remember those?   They were white, pink and brown made by Brach's.


It's hard to tell the scale of this heart but those who are familiar with the Movers and Shapers die  then you'll have a good idea. 

Here's a few more samples but with only one layer of felt.  The felt embellishes on the hearts are from the new Sweet Pea Stitched Felt from SU!.  The chocolate heart is embellished with the Flower Fushion pieces.  Both of the felt accessories from SU! work so well with this project due to the small scale of the heart.

Aren't they YUMMY?!  They look like candy to me, which is why I call them confections.  So dainty, so pretty.  Below they adorn a fancy hanger, but wouldn't they look just as lovely as a tag for a gift?  My original idea was to create a garland with them (and I still may do just that).


Here's a better view of the individual hearts.  The polka dot ribbon is the "Mambo Melon" by SU!.  One of the sassy new In-Colors.  To make the flower, simply stitch one side of the ribbon, pull the thread to gather it and sew the ends together. 

It doesn't take any time to put these babies together, especially since the bulk of layering is already on the pre-sewn Stitched pieces.   To assemble the hearts, tuck a piece of cotton thread between two felt hearts and use your Tombow Multi-purpose adhesive to glue them together.  What's great about the adhesive here is the very fine tip allows you to guide a thin line along the edges.  It holds GREAT (I know because I tried pulling them apart).  You'll use the same glue to attach those felt pieces to the top.

The beaded trim is something I had laying around the house; thought it added a more girly feel to the piece.  The only other addition I added was a little sewing with embroidery floss around the brown heart.  A tip in case you try this at home.  If you'd like to sew around the heart, then don't use the glue.  A needle does not penetrate that glue easily at all.


Now let's move on to the next project.  Looking for another great use for your  Petal Card Bigz?   How about Jumbo stuffed fabric hearts?   Here are a few I threw together.


The red heart is cut from fleece and is used as a pin cushion.  The edges were sewn together with a machine and then pinking shears were used to cut a decorative edge.  They are all stuffed with polyfil.

The white flower may be familiar to some of you.  It's the same flower used on the Little Fleece Baskets (taken from the Baskets and Blooms Bigz).


Making the hearts are easy.  Just cut your fabric from your die and trim off the two of the four petals. 

This chocolate felt heart is a bit different.  You'll cut two piece of felt but remove two of the petals from only one piece (the front piece).  Glued three sides together leaving the bottom left open to stuff with polyfill.  Stitch the opening after it's filled and then wrap the bottom petals from the back heart around to the front; sticth in the front to make the pouch.  Use some green grosgrain to make a flower and embellish once again with your felt pieces. 

The green flower was made the same as the pink polka dot listed above, and then sticthed to the heart.

I'll upload instructions for you next week for those who need a little more explaination.


There you have it!  Now you can go practice making your own valentine fabric confections.

Melanie

January 5, 2010

Paper Crafters Sampler ~ Very Valentine

Just THREE MORE DAYS till our premiere issue of Paper Crafters Sampler goes live!   Take advantage of the Earlybird special before the 10th!

Now for a little sneak peek of what January issue "Very Valentine" contains.  Make sure you check out our Promo Sampler publication.  Remember, you must join the NING site first (It's free).  Feel free to browse the site.  LOTS of more Valentine ideas coming.


January 4, 2010

Sweet Heart Confection Bundle


I've created a special Sweet heart Confection Bundle for those who would like to try your hand at creating my felt fabric hearts. The bundle includes enough precut fabric pieces to create 10 of the small pink and chocolate hearts, with additional fabric to create two stuffed hearts (one chocolate and one red).  Here's a breakdown of what's included:


  • 10 precut pink fleece hearts
  • 10 precut chocolate felt hearts
  • 2 precut chocolate jumbo hearts
  • 2 precut red jumbo hearts
  • Cotton thread
  • 24" 5/8" Melon Mambo grosgrain ribbon
  • 24" 5/8" Old Olive grosgrain ribbon
  • 12" 1/4" pink grosgrain ribbon
  • 24" Pink and Chocolate DMC floss
Not included:
The Sweet Heart Confection Bundle is available for: $8.00 (includes S&H)

The bundle can be yours FREE with the purchased of the Sweet Pea Stitched felt, Flower Fusion and Multi-purpose adhesive available on the website:  melaniestamps.stampinup.net.  Once I receive confirmation of your order, I will pack up your sweet bundle and send it on it's way.

Keep in mind while ordering that  Sale-a-baration is currently under way.  With every $50 purchase you receive a free item from the "Sale-a-bration" mini brochure. 

If you'd like the bundle only, you may select the Buy Now link below to make your purchase. Please allow 24 hours for processing.


January 3, 2010

Paper Crafters Sampler ~ Preview Issue

Have you noticed my abscence in the blog world?  Well, it was for good reason.  I've been working on a amazing project for past several months and now that the new year has arrived, it's time to reveal.

Intoducing the Paper Crafters Sampler.

Paper Crafters Sampler consist of several creative Stampin' Up! demonstrators.  Each month our design team members create a project based on a theme to get your creative juices flowing.

Below is a link to our complimentary sampler and highlights the amazing artwork of our talented designers.
Make sure you check out our Earlybird Special, good until January 9th. 

January 10th will launch our Premiere issue featuring "Very Valentines".  A must have for all those who are in need of some creative Valentine projects you can create for friends, co-works and use for your monthly workshops.

Preview Issue


I hope you all enjoy the Paper Crafters Sampler as much as I have enjoyed pulling it all together.

Melanie