Showing posts with label greeting cards. Show all posts

February 4, 2011

Valentine Card Submissions

I posted these Valentine cards way back in September for a magazine submission.  Now that it's officially February, I thought it might help spark some creative juices for everyone.


"Sally's wearing a red dress, red dress, red dress.  Sally's wearing a red (with polka dots) all day long."


...add a few poppy dots with your poppy marker to add extra character to the designer paper...


...and my FAVORTIE...


August 4, 2010

Valentine's in August

Spent the weekend working some Valentine projects to submit to a publication.  Yanked the 6 foot table from the shed so I had some room to spread my supplies.  All crafting took place in the living room.  I like to be present where the kids are (even though my concentration was on my crafting).  Kind of like sitting in the yard and listening to the birds together, although this time they were listening to my tape runner.


Here's a little glimpse of the projects I completed, awaiting the mail.


I know it's not much fun to see sneak peeks of artwork, so I've created an extra card to share with you.


So, what do you think?  I'll tell you want I think, and that's Cherry Cobbler and Early Espresso look awesome together!  Very dark, very rich.  They're great for a masculine valentine.  I wasn't really going for "Valentine" but she's holding the darn thing.  I'm going to omit the heart next time or put someting there in place of it, maybe a teddy bear.   Maybe a ball of yarn unraveling on the card?  That finger on her chin makes me think she's being mischievous.

I stamped on the Cherry scallop with the medallion from Artistic Etchings


The boys are having a pillow fight in the back...and now I hear crying.  Time to run!


March 25, 2010

Bloom'n Forget-me-nots

Having fun with watercolor paper and wax watercolor crayons.

Check out the swirls behind the egg on the green cardstock.  That's the "&" sign from the SU! Together Forever set.  That particular piece of cardstock needed a sudtule image since the main background was so busy.  It worked out great.


The egg was cut from 140lb watercolor paper.  Afterwards I applied various green and blues washes with my wax crayons.

HAD to pull out my faithful old Linen background stamp.  I think besides for the Cheescloth background, the Linen is my all-time favorite.  Here it was stamped in Basic Brown ink on both of the Celery cardstock.


January 19, 2010

Tour de Freaks ~ Sweet Valentine


It's time for another Tour de Freaks. It seems like forever since we've had a hop being that we took a little break during December. We're refreshed and back at it.


This month we're celebrating Valentine's Day and have some fabulous projects to help you get your creative juices flowing.   If you've been following the "next stop" links you've probably just come from the amazing Gretchen Barron's blog.  Her projects are always so creative.

This month, I've created two projects for you.  First up, my EXTRA LARGE "hugs" card.  I say extra large because it was created from a full sheet of cardstock (shaving a 1/4" off both the top and side).  You'll need this extra large card to fit the jumbo sticky cuts letters.

For those not familiar with sticky cuts letters, the back peels off so you can stick the letters directly to paper.  Once down, simply peel the top layer off, revealing the sticky ahdesive underneath.  These sticky alphabet are great for adhering the chunky Essentials Glitter, seed beads or microbeads.

You'll see two new products offered by Stampin' Up! in my sample.  The Scallop Trim border punch (from the Sale-a-braiton catalog) and the small heart punch in the new Occasions Mini catalg.

To recreate the layers for the hanging heart, start with the Three Hearts punch, next the small heart punch, finishing with the smallest heart from the Three Hearts punch.  The white line was created with a signa-gel pen.


The hearts shown in the sample below were created with the small heart punch.  The Multi-purpose adhesive works well to hold the glitter on these small hearts.


A closer look at that tri-layer heart.


Next we have pretty floral Valentine card.  What do you think of that beautiful pink satin ribbon?  Another newbie item from the Occasions Mini.  There's something about silk ribbons used on cards that give them such an elegant feel.

The Valentine stamp is the "Hostess Best" set.  There are flowers on this stamp, but I simply colored the rubber image that I wanted to include (this technique is called omitting).  I went a step further by stamping the "V" in red, cutting it out and mounted it with dimensionals on the card.  Used my Three Hearts punch to create a little pink heart to tuck inside the "V".  The paper is the scrumptious Sending Love designer series paper.


Here's a closer look at that tiny little heart.


I hope you enjoyed my Valentine creations this month.  Next up is the oh so talented Connie Babbert.  She's got some spectacular projects to share.

January 10, 2010

Easter Blessings

Thought I'd fit in a quick post on this beautiful Sunday afternoon we're having (even though it's in the 40's outside).  Here's a card I created using the new "Abundant Hope" clear mount stamp set from SU!. 


Here's a brief how-to:

Stamp your main image in Basic Brown (because it gives a softer feeling than using stark black).  Use your Watercolor Crayons to color in your Daffodil and leaves.   Using your Signa-gel pen, go over the brown lines on the flower petals.

The butterfly was stamped in Cameo Coral ink and stamped off once using the new "Butterfly Accent" stamp.  Once you stamp off once, turn your butterfly stamp over, ink up the Very Vintage wheel in Basic Brown ink and  roll it over the butterfly stamp.  This is similar to the kissing technique, except we're using a wheel instead of another stamp set.  It allows you to add texture to a solid stamp image like the butterfly.  It's a great technique. 

The second layer of the butterfly is simply the Beautiful Butterfly Bigz.

So, there you have it.  I told you this would be quick.  Enjoy the rest of your weekend. 

December 23, 2009

Turtle Parade and Holiday Treats

Playing with my new Fox and Friend set.  Here's something I whipped up.


Paper:  Durango, Olive, Chocolate, Vanilla
Ink:  Olive, Durango, Curry, Chocolate
Stamp:  Fox and Friends (Occasion Mini) and Trure Friends.  If you look close at the chocolate card stock you can see the text from that set.  The "Thank You" is from the Overall set.
Accessories:  The leaf is from the "Two-step bird" punch and the decorative edge for the label is the "Scallop Trim Border" from the upcoming SAB catty.


Here's some other things I"ve been working on. 

Making some imitation Thin Mints for holiday gifts.  So many friends enjoy hand-made goodies but rarely have the time to make them.

The recipe is easy.  You only need three things:

  • Ritz Crackers
  • 1 block Almond Bark (that large block of chocolate)
  • Peppermint OIL


Chop your chocolate so it's easier to melt.


You want to use a double broiler.  I make my own.  Just fill a pot with 1/2 cup of water and let it simmer.  Place a smaller metal pot on top to melt the chocolate.  Here I'm using a mixing bowl.


Once the chocolate is melted, add 3 - 4 drops of oil.  Make sure it's OIL and not extract.  BIG difference.  Sometimes when pouring oil out it hugs the side of the bottle.  To eliminate that I simply rest the bottle on the side of my fork and let it drip down the side.

Dip Ritz in chocolate to coat, and remove it with a fork.


Lay them on wax paper, this will help to remove them easily.  I cut the Ritz box and lay the paper on top of that.  After the tray is filled I put them in the freezer to chill for a minute so I can move them without chocolate getting all over.  Then I can reuse the tray.


I placed a few of the cookes inside some saran wrap, tied them up and wrapped some holiday fabric around them. 

Use a plate to trace a circle and cut around them with pinking shears (because it makes the edges pretty).


I added some of my Advent MDS prints and a gold ribbon to tie it up.


Here's a couple of bags I've made. 


Now, back to stamping!

Melanie

December 19, 2009

Mojo Scallops

Yes, I've been absent for a few days.  I'm working on something really exciting that will be unveiled the day after Christmas.   It's taken lots of time to coordinate and prepare for.  With the unveiling so close, there's the inevitable tweaking here and there which requires me to be away from my blog.

I did however manage to compelte my first ever Mojo Monday Challenge.  I've been wanting to participate for a while, but something always seems to get in the way.  Not this time.

Without further ado, here is my creation for Mojo #117.


Before you say anything I know it's missing the bow on the right.  I couldn't bare putting it on and covering up that awesome ribbon.  It just would have been to much extra.  Besides, I've noticed there were a few other cards that omitted it.

There was also the option of adding a button to the center of the flower but again, too much.  I must have put that button on and off for over 1/2 hour trying to decide.  Geesh!  Anyone else have that kind of dilema when designing a card?

Now, off to work on some other projects whilst the kids are away watching the Saints game.  Quiet time, yeah. 

Have a great night.

Melanie

December 8, 2009

Bubblegum Inspiration

Bubblegum inspiration may be somewhat of a stretch for this post title.  It refers to the color in this wrapping paper I found tucked in my stash of collectibles.  How often do you find the color pink used during the Christmas holiday?

Not sure where the paper came from.  I believe it's left over from a gift I received, really I can't remember.  I collect so much stuff; honestly, it's possible I'm part squirrel.  How ironic that squirrels are my LEAST loved four legged creatures??

The colors in this gift wrap were very appealing, as well as the artwork.  So folk-artsy.  The stitiching around the squares, the quiliting pattern.  All around, something wonderful to use for inspiration, which is exactly what you'll see below.

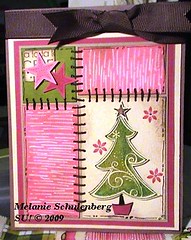
Here is a card I completed using part of the pattern from the paper.


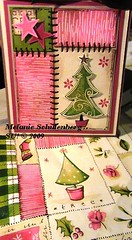
Here is the card with the section of the paper used for reference.  What do you think?


The stitching was all by hand.  I've been wanting to 'stitch' something.  How odd is that, the NEED to stitch? 

Several products and techniques were used to create the shading; inks, watercolor pencils, chalks; whatever I had on hand was put into play (more experimental than anything).  Just playing.

The star images and tree used were Stampin Up! sets.  The white stripes on the Regal Rose card stock is a white gel pen.  Brown sewing thread was used, due to the fact I didn't have a single brown embroidery thread in my floss basket.  Well, not the brown I wanted.  So, the alternative was to use regular brown thread, four layers of it to achieve the thickness.  Somehow the card just doesn't have the write 'feel' to me knowing that I couldn't use floss like I wanted.

Guess this calls for a road trip to tomorrow to pick up some floss in the dark brown; which surely will come in useful for future hand-stitched projects.

Toodles.

Melanie

October 23, 2009

A space to create

Finalized a few projects I have been working on. It was time to get back in gear for Halloween art. First thing on the list, get my work station cleaned.

Here is what it looked like after I cleaned up a bit. It was MUCH worse than this. I have a habit of starting off with a big area to craft and work myself into a teeny, tiny workspace. See that grid sheet in the center of the table? That was the only thing you could see before I took the photo.


Here's what it looked like after. I took all of the 'tidbits' on the table from the upper right corner and threw them into a tin pan. Generally I like to sort it out so I can find it in the future but I was trying to cram in some art time before the kids came home. No time for sorting just yet.

That stack of papers on the upper left-hand side of the table was under the SB paper you see in the photo above.

What happens now? Start making Halloween projects and restock the table with 'stuff', eventually narrowing my work space back down to that one little grid sheet.


Here is Jack, aka "The Beast". He is what keeps me company the entire day. Not that I 'need' the company or want it. He follows me around the entire day; well, most of it, part of the time he's sleeping

When I'm creating, he shows up in the same room and stares out the window. It's worse around 3pm when he knows the kids will be coming home.

Still not sure why the spouse thought we needed yet another thing to take care of. Just something else to clean up after (taking time away from my creating). He is a pretty dog though, and trained if there is 'food' involved, otherwise, he's got free reign to do what he wants to you. Both the boys hit the ground when they see the dog coming, otherwise he'll knock them right over. He's as strong as an ox. Well, strong enough for the 5 yo to ride on his back until I catch him and make him get off.


OK, enough of That Dog. Here's one of the cards I put together whilst waiting for the kiddos to arrive. Two projects developed during this particular stamping hour, but I'll have to wait to share the other b/c the 5yo is in the back crying (his big brother left him alone; he's still in the "scared of being alone" phase).


Have a great weekend everyone!

Melanie