Showing posts with label template. Show all posts

November 10, 2014

PCS November 2014 ~ Holiday Fun

Get ready for the holiday with a few of these crafty project ideas from the November Sampler, "Holiday Fun".
This month's template is the Holiday Secret Gift Box.


$12.99
  

Here are a few sneak peeks for you:


October 10, 2013

October Sampler ~ Abundant Thanks


The October 2013 issue of the Sampler has arrived.  The issue, “Abundant Thanks”, offers project ideas for celebrating Thanksgiving.  Inside this issue you’ll find seasonal holiday banners, table settings, gift ideas and of course, beautiful hand-made cards.
 
While recreating the projects in the issue, take time to reflect on all things you are grateful for and the anticipation of gathering with family and friends to toasting your blessings.
 
Here's a sneak peek of my project using the new Horn of Plenty template.


October 20, 2012

Spooktacular Treat Pocket


Can you believe there's only 11 days till the end of October?  Where has the time gone?  It seems like the month JUST started.

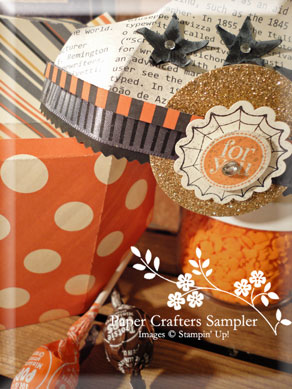
I'm still cutting away at some halloween treat pockets.  This one is designed more for adults than the kids. Just another idea using the Pocket Acorn from the Septemeber issue, "Autumn Amidst" from the Paper Crafters Sampler.

 
A little glitter paper and rhinestones to jazz the treat pocket up.

 
Tuck in a few sweet treats, or nuts for the healthy heart types.

 
A shiny black and grey ribbon around the rim of the cap, topped by a strip of orange and black designer paper.


Thanks for taking a peek at another Creative Take on the Pocket Acorn.


April 9, 2012

Make Mine Vintage Sneak Peek

Tomorrow the April issue of the Sampler will arrive. Here's a little sneak peek of my projects.    The projects this month are designed with a Vintage theme, thus the name of the issue, "Make Mine Vintage".


April 3, 2012

Rejoicing With You

Here's a little something I put together with the anticipation of Easter arriving.  A little table-top free-standing cross.


The wedge-based cross is was designed for the Paper Crafters Sampler (PCS) and is available as a free download on the PCS website.

The template prints on an 8 1/2" x 11" sheet of cardstock and has minimal scoring.  Here I've cut the inner guideline to add the additional embossed layer.  The grass was created with a paper crimper and the daffodils are from an older stamp set 'Abundant Hope'.

I'd love to see your Creative Take on this.  Here's a few more images for you:


March 28, 2012

Paper Crafters Sampler ~ High Tea Blog Hop

Thanks for joining the "High Tea" blog hop.   What do you think of the Creative Takes on the "High Tea" template so far?  The design team did an amazing job!

For my teapot, I couldn't stop thinking of those cute Mary Engelbreit images with bold stripes and polka-dots.   The dots and colors on the paper I choose really fit the bill.   Here it is in full view.


I've created a little ranculus flower by creating a spiral cut of two different colors of cardstock.


Here's a close-up of the hole near the base of the pot.  It's designed to pour small solid objects out of the hole and down the spout.


I hope you've enjoyed my Creative Take on the High Tea template from the "Orange Blossom Tearoom" issue.  If you'd like to see the previous pot, you'll want to go back to Heidi Baks blog.  If you're ready for the next Creative Take of the teapot, click the button below and you'll be transported to Lisa Hensley's blog.


January 30, 2012

Easter Blessings


It won't be long before the February 2012 Sampler is released.  The "Easter Blessings" issue is dedicated all to Easter, showcaseing baskets, bunnies and pastel themed projects to coincide with spring colors.

Included in the February 2012 issue is the newest, exclusive template. "Bentely Bunny".   Fill him with goodies, flower springs or brighly coloredEaster eggs.

Easter Blessings release date February 10th.


January 5, 2012

Sweetly Dispensed

Just four more days till the Early Bird special ends for the 2012 Paper Crafters Sampler.

Here's a specialty template offered in the first issue "Expression of Affection".  While the January issues isn't officially released until the 10th each month, you can pre-order the template now and start working on your very own Sweets Dispenser.

Be sure to check out the main PCS website to see our newest design team members and their blogs for a sneak peek of what they've created for the upcoming January issue, "Expression of Affection".


*** For those of you pre-ordering the January issue now to start on your Sweetly Dispensed container, be sure to save your download link.  You'll use the same link on the 10th to access the entire "Expression of Affection" Sampler. ***


$12.99
 
 
Sweetly Dispensed M&M container:

  • Cut and score the Sweetly Dispensed container according t to o directions. Assemble the bottom to the back of the body.
  • Trace the front flap onto the back of the Enchanted DSP (from the 2012 SAB). Using a ruler, measure 1/4" on the insides and top of the DSP (not the bottom). Cut down your card stock to these 1/4" marks. Use your Adorning Accents Emb. Folder on the base of the Enchanted DSP. Trim along the embossed area, removing the DSP extending past the edge.
  • Emboss the base of the red flap with the Adorning Accents Emb. Folder and trim off the bottom along the raised edge.
  • Attach the DSP to the top of the red flap. Score again along the guidelines on the top flap. Crease the folds well. Bend so they roll around, allowing the flap to hang over the dowel.
  • Emboss a piece of Vanilla card stock using the .... embossing folder. Trim around window.
  • Cut down a piece of Soft Suede cardstock to fit inside the window of the Vanilla. Roughen edges with Cutter Tool. Stamp the Doily image from Kindness Matters on two opposite sides of the Suede square. Attach to inside of Vanilla window.
  • Stamp text from the P.S. I Love you set onto Vanilla cardstock. Remove text with Window punch and layer to top of Modern Label red card stock punch. Attach brads to side and use glue dots or dimensionals to attach to front of Suede Square.
  • Create a Suede scallop circle and Vanilla Doily circle. Punch holes in center of each and attach to top sides of box.
  • Stamp butterfly from Kindness Matters onto Vanilla card stock with Suede ink. Cut out. Enhance by adding additional lines with red Stampin' Write.
  • Create butterflies with embosslit and attach to box. Attach Kindness Matters butterfly to top of embosslit butterlfy.
  • Cut a stripe of DSP 1" x 12". Attach to base of box, trim off excess.
  • Attach flap to box.

November 27, 2011

Elfin Shoes Treat Bag

Putting a few more of those narrow cellos to use for the holiday. 

The bag is stuffed with Runts candy (although any small candy will work...nerds is a good alternative).  Used the curly-toed shoe pattern from my candy-leg witch HERE


October 24, 2011

Candy-leg Witch

Another curly-toed shoe treat.  This may be the last of my Halloween projets.  Moving on to Fall.  You can download the shoe template I created HERE.


February 21, 2011

Sixlets Easter Cross Box

Playing with the Easter Cross Box Template.   This little box was stuffed with some Easter colored Sixlets chocolates.  What was most difficult about this was trying not to eat the candy. 


January 16, 2011

Sunny Heart Blossoms

Still playing with the 3D Heart shaped box template from PCS.  Testing some colors for Valentine other than the typical Red and pink.  Thought some pretty yellow flowers would be a change.


A bit of glitter on the new butterfly from the upcoming Bliss stamp set (a Sale-a-bration set).  In fact the flower on the side is from the same set.  Add a pearl to the center of the ribbon flower.


Tucked inside is a pocket heart.  Stuff with treats or a special Valentine note.  You can create this same pocket heart using the Petal Card Bigz.  The flourish in the center is from the upcoming Bliss stamp set.


The blossoms were easy.  Simply create a baste stitch along one side of the ribbon like this...


Then pull gently so the ribbon starts to curl.  You'll only need a 4" to 5" strip of ribbon.  I used a daffodil color here.

January 11, 2011

Ruffled Love......

Nothing screams girly like ruffles.  Created this using the new Heart gift-box template in the January issue of Paper Crafters Sampler.


and a few close-ups


Sweet images from Style Beautiful embellished with a white gel pen.


May 18, 2010

A Grand Entrance

Here's a little something I made using the Glamour Girl dress box template in the May issue of PCS.

The template is designed to be used as a favor box.  Here I simply omitted the goodies and dressed it up (ha ha) for fun.   These would make great decorations for prom, especially if each box was designed to resemble the girl's actual dress.