Showing posts with label 3D. Show all posts

November 18, 2014

Pinecone Crafting

 
I've had a desire to make a simple, realistic, 3D paper pinecone ever since I spotted this cutie.


It's a great embellishment, especially this time of year when you see pinecones scattered on the ground.  Think I'll give it a whirl and see what I can come up with.
 
I've compiled a few more images for ideas.  Some of these are so clever!  Look at this whimsical beauty below.


Here's something for those who like uses e-cutters for less labor intensive work.  Loving the uses of alternating colors on this.


For those who are fabric lovers and would like a bit of color, here's something for you.


Of course, there are many other ideas available online.  These were along the lines of what I was looking for.  Think I'll give it a go on some of these ideas.
 

February 24, 2013

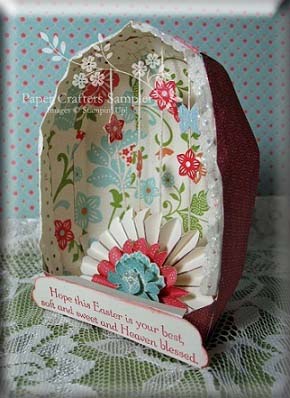
Spring Lotus, Egg Niche


Putting together a few projects together using the "Egg Niche" template from the 2013 February Sampler, "Easter Morn".  With Easter and Spring both on the way, it wasn't difficult to choose which type of scene to I wanted to tuck inside.


Everyday Enchantment is one of my all-time favortie designer papers and was the base for which the Egg Niche is made.  
 
 
A few hand-stamped images from the "Fresh Vintage" stamp set and butterfly embosslits attached to cream-colored crochet thread.
 
 
Create a few half-spiral fans for the base.  Cut 3 of the lotus-type flower from the Everyday Enchantment paper and layer with dimensionals.  Add pearls for that 'extra' detail and Easter text from the "Heaven Blessed" stamp set.
 
 
Here's the final project.  Thanks for looking.


October 20, 2012

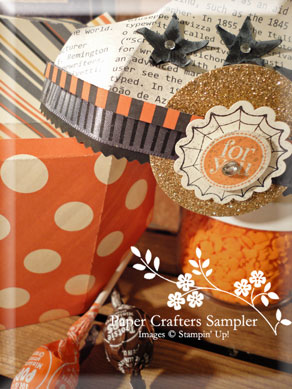
Spooktacular Treat Pocket


Can you believe there's only 11 days till the end of October?  Where has the time gone?  It seems like the month JUST started.

I'm still cutting away at some halloween treat pockets.  This one is designed more for adults than the kids. Just another idea using the Pocket Acorn from the Septemeber issue, "Autumn Amidst" from the Paper Crafters Sampler.

 
A little glitter paper and rhinestones to jazz the treat pocket up.

 
Tuck in a few sweet treats, or nuts for the healthy heart types.

 
A shiny black and grey ribbon around the rim of the cap, topped by a strip of orange and black designer paper.


Thanks for taking a peek at another Creative Take on the Pocket Acorn.


September 10, 2012

Autumn Amidst ~ Sept. 2012 PCS


The Fall issue of the Paper Crafters Sampler is all about Autumn.  This month's Sampler highlights the rich, earthy colors of the upcoming fall landscape.
 
The Autumn Amidst September 2012 Sampler projects includ beautifully colored cards, fall centerpiece and table setting accessories in addition to an natural family frame photo project.
 
This must exclusive template is the 'Pocket Acorn'.  The template was designed to be used for several upcoming holiday projects.  Stuff treats inside for adults, children or simply use it to decorate your home.
 
Here's a few sneak peak of my project:


April 3, 2012

Rejoicing With You

Here's a little something I put together with the anticipation of Easter arriving.  A little table-top free-standing cross.


The wedge-based cross is was designed for the Paper Crafters Sampler (PCS) and is available as a free download on the PCS website.

The template prints on an 8 1/2" x 11" sheet of cardstock and has minimal scoring.  Here I've cut the inner guideline to add the additional embossed layer.  The grass was created with a paper crimper and the daffodils are from an older stamp set 'Abundant Hope'.

I'd love to see your Creative Take on this.  Here's a few more images for you:


February 17, 2012

Bentley Bunny Goes Floral

Introducting Bentley Bunny, the newest EXCLUSIVE tempalte in the February 2012 issue of the Paper Crafters Sampler.  Bentley is part of the "Easter Blessings" issue.

The February Sampler went live on the 10th of the month, but since then I have revamped the template to include a 'visual' assembly.  I'll be sending the revised issue out to those who have purchase the issue prior to the 18th.

Here's looking forward to Easter!


A little close-up of the layered flower using the scallop punch.

January 20, 2012

Boxing Die Cuts


A tutorial for making a box from die cut shapes and templates.  Enjoy "Boxing Die Cuts".


January 19, 2012

Taffy-colored Valentines

Aren't these colors yumm-o?  Looking for some alternative other than the typical Valentine color-schemes. 

If you're interested in doing making the Valentine box yourself, check back tomorrow for the tutorial I'm wrapping up. 

* Tutorial posted HERE *


This flower believe it or not was the most difficult.  I kept going back and forth with what shapes would compliment the box without over doing it. 

Always remember how important details are (RE: the dots around the inner Vanilla circle).  Sometimes it can be the finishing touch to pull it all together.


What Valentine isn't complete without a few sweets?


Here's a peek of what I did with the Soft Suede layer. 


December 10, 2011

12 Days Countdown Vintage Stocking

The December issue of the Paper Crafters Sampler, "Adorned Holiday" is LIVE today!  An issue filled with beautiful projects for decoratingyour home or offering as gifts to family and friends.

Here's a little sneak peek of a magnetic stocking to brighten up your kitchen or filing cabinets.  Each date is replaced as you count down to the last 12 days of Christmas.


Another sneak peek of the Holiday Sled Gift Box.


November 22, 2011

Metallic Mocha Scallop Box

I whipped this up in 30 minutes.  Yep!  I printed the base on Suede cardstock using the Scallop box template from Mirkwood designs.  Be sure to check out the link.  More than likely you've come across it in the past...just simply forgot it was out there.

For the top, I traced the base (that I cut out) onto the Metallic Mocha cardstock.  Added a little label, half of accordian scallop (made with the round scallop punch; scored to make peaks) and embossed the edges.  Tuck the gold waffle paper behind and WALLA! 

It's hard to see but if you zoom into one of the images you can catch a glimpse of the metallic-ness (add that to my spell check) of the paper. 

This quick box would make a great presentation for tucking in a Christmas (or better year, New Years) gift.


July 9, 2011

Royal Crown, Lace Brooch


I created this little embellishment while finishing up some samples for a publication. A sliver crown stuffed with sweet ivory lace and a red velvet ribbon.


The original peice was designed to embellish a card but I thought it would make such a sweet embellishment for those winter coats. Simply tuck a pen on the back an walla!

The crown and rhinestone at the top are both from Stampin' Up! 


July 5, 2011

PCS Treasure Chest mini blog hop


It's time for a new blog hop for the Paper Crafters Sampler. This month we're highlighting a treasure chest template, which is a perfect fit for our July 2011 issue "Shore Thing".


If you've already been viewing our mini hop you've probably just come from Heidi Baks blog. If not, then you can start here and just keep selecting the button at the bottom of the post to come full circle.

I've changed my chest up a bit but stuffing it with some more modern goodies.


Alter up the pattern and stamps a bit and you could have beautiful idea for presenting your bridesmaids with a small gift, or tuck a gift card inside for offering a gift card to the bride and groom.

Now it's time to move on to Kelly Campbell and see the adorable presentation she put together for you.  Simply select the button below and you're off.

Thanks for checking out my Treasure Chest project.


May 21, 2011

Ye Olde Clipper

Bonjour!

I've been away for quite some time, yes?  It's been two weeks of preparing for finals, the end of school and upcoming events for the summer.  In addition, I've been wrapping up some personal art projects, and preparing several new templates for the upcoming issues of Paper Crafters Sampler

Now that I've caught up (a bit), I'd like to share something I've put together for Father's Day.  It's an 8" x 10" framed artwork and I call it "Ye Olde Clipper".


I LOVE the way it turned out.  The image is from My Digital Studio's "The Open Sea".  Here's a few more images.


Interested in making one for your dad, father or that special gentleman in your life?  It's fairly simple.  Here's what you'll need to do.

You'll start by inserting The Open Sea  digital stamp brush set into your document, scaling it up to the size you'd like.  Print the image onto 2 sheets of Natural Ivory cardstock (one will be your base and one will be for cutting).

A laser jet printer will work best if you don't want your lines to bleed, but I used an inkjet print.  If you use an inkjet, try to handle the cardstock from the edges to prevent extra smudging.  Some smudging is OK as it gives the look of being worn and aged.  You can always spray a light coat of spray fixative on top.

Start with one of the printed images, adding watercolor around the perimeter of main image.  I used watercolor crayons and a paintbrush for blending.  Let this sheet dry. 

Take the second print and apply color to the sails.  If you've used the inkjet printer and didn't seal the ink, be sure to add color gently as to not fade the printed image.

Cut out the top-most sails and bend gently to give shape.  Apply dimensional or foam mounts beneath the sails to lift.  Once the sails are attached, use a needle and black thread to add lines to the ship.  Don't feel that you need to follow the same lines on the ship.  You'll want a few to be offset; it adds to the originality of your piece.

That's it!  I hope you enjoy creating Ye Olde Clipper of your own.


March 21, 2011

Sunny Blossoms Watering Can

Looking for something to brighten your drab gray office walls?  Something bright and cheery to serve as a reminder that you'd rather be home creating??

How about this:


Tucked a little floral foam underneath to support my bright blossoms.  Gotta love your styrofoam.


....and, I have a tutorial to show everyone how to do it.  Give me some time to compile the video...it's a doozey!  I've got lots, and lots and LOTS of editing to do.  I'll do my best to have it up by Thursday.