Showing posts with label Altered Art. Show all posts

May 2, 2010

The Poet's Attitude ~ revealed

If you caught my Thursday post, you'll know what I'm about to share?  Below are close-up images of my shadow box created for the new P3 design team challenge. 

Make sure you read the FULL post to learn how you can win this box for your very own!!!


The base of this project is a shadow box purchased from a dollar store.  The cameo and lace were also both purchased from a dollar store (the cameo being part of an elastic hair tie).

The remainder of the supplies are simply from my crafting supply stash or purchases from flea markets and antique stores.


Let's not forget, I am a rubber stamp artist so it seemed only nature to include at least one hand-stamped image.  I took it a step further and embossed (referring here to the gold flourishes on the fan fold paper).   


The background of this box has a soft glaze of white acrylic paint and blue watercolor crayons.  The little castle on the dark heart was clipped out of a book, juast the text, "the poet's attitude".  

Still here with me?  Keep reading....this box can be YOURS.


You'll find additional text in the upper left corner of the box with my own hand-drawn images.


As well as the upper right.....


Chalk and various other antiquing effects were applied to the background and paper embellishments.  The buttons are from my button jar stash (another flea market purchase).

A simple strand of cotton string was stained first and added to give a bit of softness.


My black Pitt artist pen came in handy for writing on the top-side of the box, which was first covered with a wash of acrylic paint, and smeared with chalks.  This technique was also applied to the inner box.


I'm working on another box already (along with several other projects).  If you didn't get a chance to see ALL the shadow box ideas, be sure to check out the P3 blog. 

I'm going to chose one lucky reader to win "The Poet's Attitude" shadow box.  All you have to do is leave a comment on this post OR sign up to become my "Google Friend" and you're automatically entered.  I'll be selecting a winner on Wednesday May 5th.   Good luck and thanks for stopping by.

April 29, 2010

The Poet's Attitude (preview)

If you're an avid reader of this blog, you're in for a BIG weekend!

First up we have the Paper Crafters Sampler blog tour highlighting sneak peeks of the May sampler, "Together Forever, the wedding issue".  Included in this blog tour are samples offered by the design team of the pyramid box template in the May issue.  The tour takes place Saturday morning.

What else is happening?  Well, I was asked a few weeks back to be on the design team for the new challenge blog "Paper Cubed (p3)".  It's a site designed to challenge crafters to create 3D paper projects, which pretty much leaves card making OUT.  I have to say, this is something right up my alley as I LOVE 3D projects!

Saturday will be the first launch of the P3 design team challenge.  We were asked to create a shadow box.  I'm going to offer a little sneak peek of my project below.  You can view the full scale project Saturday morning on the P3 blog.  I'll have close-ups on my blog Sunday, so check back then.  I'll be anxiously waiting like you guys to view the projects.  Design team members have to wait and see the projects on Saturday with you, so we have no idea what other  members have made.

Here's a snippet of my shadow box.  I LOVE the way it came out!


April 9, 2010

Redefine Creativity

Ya Know that feeling when you look at something, hold your breath and try to take it all in?  That's what I did when I came across this colorful creation from artist Alisa Burke.


Do you know what I like most about this?  It is created on book recycled pages.  In fact, many of the projects Alisa creates are from recycled material.  Take a look at her recycled box cityscape.


I could spend hours writing about how Alisa's colorful and carefree art inspires me.  Unfortunately if I did it would keep me away from creating my own art, which is what I hope many of you will be doing this weekend.  Maybe I'll try my hand at her altered parasol. 


If you're looking for a larger dose of carefree creating, check our Alisa's video AND her amazing blog where she shares lots of tutorials.


its all about the journey from Alisa Burke on Vimeo.

December 22, 2009

The Tulipe Umbrella

Thought I'd pop in and share something I created a week ago.  I've so busy chugging away at my latest adventure.  It's intense and exciting!!!!  I'll be sharing it all with you the day after Christmas, so mark your calendars.
I've altered yet another Dollar Store product.  I have to be in that store at least 4 times a week (I am NOT kidding).  Take a look at this Dollar Store umbrella I've gussied up.


I've added a Vinyl applique to the front.  It was cut from the vanilla vinyl sheets Stampin Up! offers using the Tulipe Bigz.  Kind of neat huh?  It was really easy.  Just plop a book under the umbrella and start attaching your vinly Decor Element.

I know what you're going to ask next.  Is it going to hold up to the rain?  Well, I ran it under the sink and it faired well, what's a few raindrops? Besides, the umbrella was only a dollar.  This Tulipe applique makes more elegant. 

The Tulipe is only on one panel, but I have plans on adding it to every other panel (four all-together).

So, does that get your creative gears going?  As soon as I attached the applique, I picked up my pink flowers (that were precut from SU!, not by me) and have plans to add them to the grey umbrella I purchased.  I also purchased a Teal umbrella.   Wouldn't flowers look great running along the edge of the umbrella, or cascading from top to bottom?  What about those cute little animal appliques that are precut?  Super cute!  Check out the other colors of Vinyl currently on sale.

OK...I must get back to my project.  It's been quite a few long days and nights.  The family has been surviving on pizza rolls.

Have a great night

Melanie

December 1, 2009

Sheet Music Wash

Want an easy idea for sprucing up your artwork?  How about getting a few pages of your sheet music and applying a light color wash to them?  Here's how.

Grab your favorite shade of paint.  Squirt a little dab onto a non-porouse surface.  I tend to use waxed paper as it's inexpensive and disposable when I'm finished (saving time on clean up).

Dip your paint brush in water and then into the paint, swirling around so the paint is no longer opaque and apply right over your sheet music.  The more you apply the darker the paint becomes (yes, even if it's diluted).

You can add another complimentary color while the paint is still wet so you get a nice blending effect, but don't over do it.  Remember, you're working with paper and it will start to warp.  Let the paper dry completely and then place it in a folder for your future projects.

Here's a wash I created using celery green. 


Look at the little animal figure someone drew.  Isn't that cute?  These particular music sheets I picked up from a thrift store so no telling who they originally belonged to.  I find the notes others make in books or like here on the music sheet, quite fascinating.  What were they thinking when they drew it and why?


Here's a sneak peek of what I'm working on.


I'm working on another video tutorial to show you how they're done.  I need to first complete the pieces I've been working on and get them in my Etsy account.  I'm working on a deadline ya know. 


Now, back to work. I hope your day is much drier than mine. It's been raining for two day snow and more cold on the way.  I'm not complaning though, it's Winter and I LOVE the cold and the rain together; makes you appreciate those perfect Fall and Spring days.  Luckily I'm cozy inside the house...with this:


He's perched on this window sill daily.  Eyeball the squirrels if you ask me.

Melanie

November 8, 2009

LSU Girly Collage

Next weekend I'll be participating in an upcoming holiday show here in Baton Rouge.  It's Mistletoe Market.  A holiday shopping extravaganza.  Over 100 vendors selling anything from hand-made, home decor, food and more.

I've participated in the event for several years and this year I'm mixing things up a bit.  From a demo's point of view, most of those attending the event are interested in purchasing Holiday gifts, not ordering them.  Thus the reason I've been occupied for the past few weeks.  Well, that and I've been under the weather.  Had to cancel my trip to New Orleans for a workshop which is highly taboo for demos.  Just didn't think it was wise to drive while taking sleep inducing medicines.

This year I'll be offering a few of my "Seasonal Smiley's" at the event and some personalized hand-stamped mixed media art.  I've been having so much fun working on canvas's.

Here's my latest:


I wish you could see the background more clearly.  I think it came out wonderful!  The dark purples and golds are so rich on the canvas.  This is the original but I'll be selling prints at the event.  I'll have a few available on Etsy as well (hopefully the printer services I'm using will have them in a timely manner).

Anyone notice Spell check is gone from blogger, or am I just overlooking it?  Be prepared, I am the worlds worst speller.  OK...back to getting my things together for the big weekend.

Enjoy your week.  I'll post again on Tuesday with an update.

Melanie

October 21, 2009

Matchbox Memories

Here's a fun Matchbox Keepsake box I created using the matchbox die cut from SU! You can get the free video tutorial for signing up for my NING account. PocketsofInspiration.NING.com

The box sports some lovely Zoo photos but you can create a box to suit your own needs. Think of replacing photos with friendship phrases or verses. Stuff the boxes with chocolates and share it with a friend.


October 15, 2009

Mixed Media sneak peek


A closer sneak peek of my upcoming online workshop: WAY Beyond Basics: Mixed Media and SU!.

This online workshop is designed to show you how to extend your rubberstamping supplies beyond cardmaking and scrapbooking.


October 14, 2009

September 9, 2009

Halloween Countdown Calendar

Who's a fan of Halloween, Halloween, Halloween? It is one of my FAVORITE Holidays.

I've been working on something extra special! While I'm dying to share with you, it'll have to wait until I finish writing up all the class details. Until then, enjoy this sneakity peekity:


August 25, 2009

From Dollar to Dynamic

Final editing of my first online workshop series "From Dollar to Dynamic" is complete. This series shows how to take a mundane item and alter it into something extraordinary.

Why an online series? What could be better than gathering your supplies and sitting in the comfort of your own home to create your very own art; much less with items that cost not more than A DOLLAR (so you don't feel so bad if you mess it up).

Look, the cost of a mixed media class like this would cost a minimum of $30 at a local craft/art store. Here you've got a video to use for future reference, TWO projects and the opportunity to create when it suits your schedule, not the store schedule. I find that especially appealing as a mom; most of my projects are done in the wee hours of the night.

Below is a sneak peek of what the workshop entails. Early bird registration of $25.00 by September 5Th; after which the workshop fee becomes $35.00


June 11, 2009

Father's Day paperbag tutorial

Here it is. Sorry for the delay. It took forever to edit. The kids are hounding me to get outside.

This should inspire you to go create one for yourself. It's quick and fun!


Have fun.

Melanie

June 10, 2009

Father's Day paperbag book

Here one of the five creations for the Tour de Freaks Blog Hop on the 20th of this month. However, being that the hop is the 20th and Father's day is the 21st, I thought it would be better to share this now for those who might be interesting in creating one for their Father/Dad. I'll make something different for da Hop!

Make sure you come back for the video tutorial tomorrow (by noon). It'll take some time to put together.


Lat-uh gat-uhs!

Mel

June 4, 2009

Decorative Pencil Box

Here's a little something I created as a challenge project for a friend. Think she'll like it? Of course, it works just as well as a paintbrush holder.


Come back tomorrow for sneak peeks in the new 2009-2010 SU! catalog.

June 3, 2009

2009-2010 SU! In Colors

Look at the vivid new Stampin' Up! In Colors for the 2009-2010 Idea Book and Catalog. They're very RICH and very BRIGHT! By Friday I'll be able to see these pretties up close (as long as the mail is on time).


New catalogs will be available for the public July 1st. If you are interested in your very own copy, feel free to select the Buy Now tab below. Catalogs are $6 and sent on a first come first serve basis. All those who purchase the catalog BY JUNE 13TH receive a $5 savings on any of my online tutorials or upcoming workshops during July - August. $5 savings must be redeemed by August 30th.


Now for a little sneak peek of something I created for my friend Janet for a "Anything Goes Challenge". It's off to the post office to make sure it arrives by Friday.


Make sure you sign up to follow me on Twitter. I'll be using that to announce many of my upcoming video tutorials, workshops and events. Be the first to know!


More sneak peeks tomorrow. Until then, keep on craft'n!

Melanie

May 19, 2009

Crafting on Canvas

Have you ever made a to-do list that just seemed to grow and grow? Well, there are several lying around here, partly because when an idea hits it's jotted down so it's not forgotten. Problem is, we're so busy with the 'everyday' that doing a to-do list comes second.

Two weeks ago I was given the boot (laid off). It was bittersweet really, losing a job is never good but at the same time it relieves you of office duties to catch up on things that have gotten away from you (like your ever growing to-do list). Thus began the completion of a baby canvas that was started weeks (OK, months) ago.

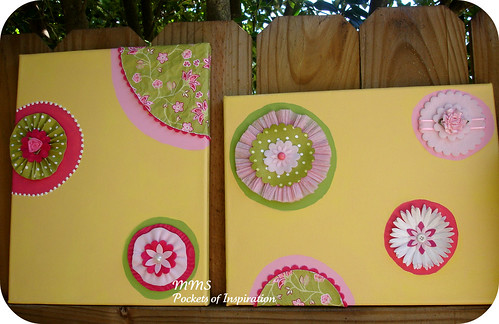
Below is the finish product. It came out nice (I think). Kind of plain really, but the pattern to the baby's room was really simple, so this worked out well. The main canvas was painted with acrylic and then embellished with felt scallops and daisies using dies, fleece, crepe paper, buttons and various odds and ends around the house. This was so much fun to make!


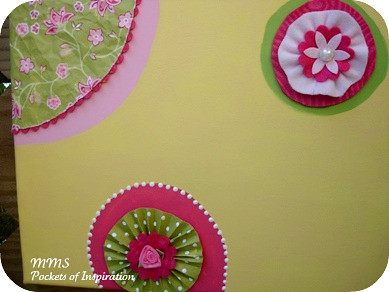
Here's a close-up of one canvas (view the other canvas by selecting this Flickr link or on the right side of this blog).

The left corner of this canvas uses "Raspberry Tart" designer paper by Stampin' Up! It really was the perfect compliment to this piece given the colors being used. The pink flower on the bottom left was originally from my daughters ballerina dress when she was two years old (she's almost 13 now). Just goes to show that all the 'stuff' we gather can be put to use, eventually.


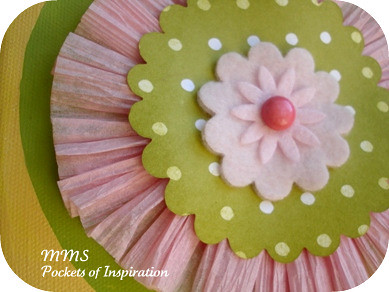
Making this pink crepe ruffle was so much fun! Really gives the canvas some girl frillies.


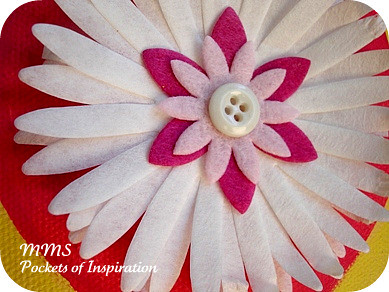
The daisy below was created using a coffee filter. Yep. Got the idea from Ms. Pam Garrison herself! That lady has some AWESOME ideas. Pam used filters to make a garland, but I thought this was just another great way to utilize them. Using tissue paper to make this flower just didn't seem to keep it as stiff as the coffee filter did; it holds up better.


This little pink fleece add-on was the most difficult. All other embellishments were added to the canvas except for the one light pink spot that remained. Mixing fuchsia and the pink was the first option, 4 days, this was the final decision. The softness is wonderful, kinds of tones down the other loud colors (it is going in a nursery afterall).


So, do you think they'll enjoy it as much as I have creating it?

Here is the final product of the Rubbapalooza Spring Soiree. Everyone seemed to create them easely and in their own style. The daisy-like flower below was made with an everyday household item. Any ideas what it is?? If you guessed Coffee Filter then you're definitely on the creative track. It's simply a layering of mulitple daisies from the die mentioned above. The branches and bird were created with THIS die and the main background was created with a napkin and applying gel medium. The options are endless using a technique like this.


Thanks for taking the time to look. Enjoy your Tuesday.

Melanie

May 15, 2009

Spring Soiree one day away.

Well, the weekend has finally arrived for the Rubbapalooza Spring Soiree. It's taken lots of planning and I'm sure those registered are going to enjoy creating the Blossoms Tapestry awaiting them.

I'm off to take care of the final preparation. First thing is to prepare the fruit tart. Take a look at these juicy blackberries that will add to the yummiest factor of the fresh fruit tart.


Below are a few more sweets for the special event made by yours truly. If you ever wonder why petite fours cost so much at the bakeries, the images below will answer your question. Each one of these cakes must be hand-dipped into fondant. It's quite messy, but product that results is a sweet sensation.

The original desire to create these cakes were for a few friends, but things didn't pan out delivering them so they were saved for tomorrows event. Roses were added (because roses and petite fours just make them more delectable). I kind of went wild wiht the piping and started making crazy designs.

Below you can see my feeble attempt to make a baby head with a small curl on top, but it looks more like a tele-tubby. The dress, well, that's NOT the figure you'll get if you eat more than 6 of these. STAP was supposed to spell "Stamp" but, I jumped ahead and put a "P" instead of an "M". Maybe I should eat this before the event so there aren't questions as to what it means, LOL!


Now it's time to finish bagging goodies and setting up tables. Here's to a fun and creative weekend.

May 5, 2009

Rubbapalooza Spring Soiree

Well, I've completed designing my project for my upcoming Spring Soiree. The colors, textures and embellishments are so, pretty, feminine. If I had planned it sooner it would have made a great gift for Mother's Day. Here's a sneak peek:


and another....


Now, to finish up that baby gift I've been working on.

Melanie

August 31, 2008

Haiku Canvas Wall Hanging

Here's a project I've been working on for the past two days. It's an 8x10 canvas covered with the new SU! Haiku designer paper. Individual images were cut from the paper to create the flowers. JustRite stamps were used to create the circular images around the 3 flowers located near the bottom.

The main canvas was painted with ivory acrylic before I got started. I added Basic Brown ink at the top only after the entire project was assembled (it needed something but not so much as a large image).

The scallops at the top were created using a circle punch and a brass embossing template. The same template was used to create the largets Scallop circle on the left of the canvas.


Here's a close-up of the flower embellishment. Several peices of flowers were cut from the designer paper and edged with chcolate chip ink. It really makes the flower pop.


Here's a close-up of the JustRite images. So sweet.


Now, I'll be away from the computer for a while as this Hurricane comes through. Hopefully I'll get some more stamping done! The rain is just about to begin. Stay safe all my friends in the path of the storm.


Melanie