The Christmas issue of the Sampler is live. Make sure you take a break during the busy holiday season and enjoy a little crafting time for yourself with ideas from the seasonal Sampler, "A Merry Season".
Showing posts with label rubberstamp. Show all posts
November 11, 2013
January 20, 2012
November 18, 2011
Turkeys on Parade
Finaly had some extra time to make a few more samples using the Turkey Place setting idea from the "Harvest Essence" Sampler. There were several new ideas I was playing with, it was hard to narrow it down. Think this weekend I'm going to try this on a larger scale.
First up is the Floral turkey. The main body uses the Spice Cake DSP. It reminds me a bit of Toile.
Thanks for looking.
First up is the Floral turkey. The main body uses the Spice Cake DSP. It reminds me a bit of Toile.
Here's my fanned turkey. The ornate image is stamped in Tangerine and the paper just behind it is Poppy (although it does look like Tangerine). It really makes it pop. The addition of the brown markings on the image were added thinking I needed more, but it looked very sweet and simply with just the fanned tails and glitter rim on the Poppy layer. Main turkey embossed with Lattice folder.
You can see the Poppy color a little better here.
Thanks for looking.
February 4, 2011
Valentine Card Submissions
I posted these Valentine cards way back in September for a magazine submission. Now that it's officially February, I thought it might help spark some creative juices for everyone.
"Sally's wearing a red dress, red dress, red dress. Sally's wearing a red (with polka dots) all day long."
...add a few poppy dots with your poppy marker to add extra character to the designer paper...
...and my FAVORTIE...
November 27, 2010
Winter's Tale
Winter is here, and with it lots of snow and bitter cold. Many find themselves occuping their time indoors, catching up on projects and finding ways to keep warm. That's what the Design Team of the Paper Crafters Sampler kept in mind when preparing for "Winter's Tale", The December 2010 issue of Paper Crafters Sampler.
Inside the Winter issue, you'll find the projects useful for before and after the Holiday season.
Here's a preview:
Winter's Tale ~ PCS December 2010 from Melanie Schulenberg on Vimeo.
With the arrival of winter comes glistening snowflakes, the holiday and time with family and friends....
Read more about "Winter's Tale at: PaperCraftersSampler.com
Inside the Winter issue, you'll find the projects useful for before and after the Holiday season.
Here's a preview:
Winter's Tale ~ PCS December 2010 from Melanie Schulenberg on Vimeo.
With the arrival of winter comes glistening snowflakes, the holiday and time with family and friends....
Read more about "Winter's Tale at: PaperCraftersSampler.com
September 29, 2010
The Witching Hour
March 25, 2010
Bloom'n Forget-me-nots
Having fun with watercolor paper and wax watercolor crayons.
Check out the swirls behind the egg on the green cardstock. That's the "&" sign from the SU! Together Forever set. That particular piece of cardstock needed a sudtule image since the main background was so busy. It worked out great.
The egg was cut from 140lb watercolor paper. Afterwards I applied various green and blues washes with my wax crayons.
HAD to pull out my faithful old Linen background stamp. I think besides for the Cheescloth background, the Linen is my all-time favorite. Here it was stamped in Basic Brown ink on both of the Celery cardstock.
October 21, 2009
Matchbox Memories
Here's a fun Matchbox Keepsake box I created using the matchbox die cut from SU! You can get the free video tutorial for signing up for my NING account. PocketsofInspiration.NING.com
The box sports some lovely Zoo photos but you can create a box to suit your own needs. Think of replacing photos with friendship phrases or verses. Stuff the boxes with chocolates and share it with a friend.


The box sports some lovely Zoo photos but you can create a box to suit your own needs. Think of replacing photos with friendship phrases or verses. Stuff the boxes with chocolates and share it with a friend.
October 19, 2009
Tour de Freaks ~ October
Tomorrow is the 20th of the month, and that means another Tour de Freaks blog hop. Today (the 19th), you're catching us during set-up, getting out all the kinks. The blog is official up tomorrow though, so make sure you come back then and see it again in all it's glory.
This month's theme is "That Special Holiday Card". If you're starting from me, then make sure you check out Julie Dinn, her blog is just before mine. She's our fearless Tour mom and has some beautiful projects to share. You can get to her blog by selecting the huge TOUR link above.
To me, nothing says holiday more than sparkly, shining, glitter. Here I took the new Serene Snowflakes stamp set and cut out the main snowflake. Stamped that puppy in Versamark and then went to town with the Cosmo Glitter (seems I can't get enough of that stuff).
The background paper is the new Cocoa DSP in the Holiday Mini. I ran it through that fancy texturz plate to give it a little more umph. Can you see the Bermuda Bay snowflakes on the background paper as well?
Here's a close-up of the texturz plate and the Bermuda Bay snowflakes.
The next card uses the same DSP from the Holiday Mini. The stamp set of choice is Patterned Pines (it's a hostess set you know). The white snowflake on the Burgundy disc is embossed in white. The burgundy snowflake was stamped on the Sahara Sand paper and cut out by hand; with the top snowflake being stamped in Soft Suede and removed with the Boho Punch.
This was a fun card to make. You know what REALLY makes a difference? Stamping that background paper with the tiny star using Burgundy ink. It pulls the card together (really...it does).
The patterned paper under the medallion embellishment is the backside of the big snowflake paper. I loved using it; keeping all the papers in the same family.
Here's a closeup of the medallion embellishment. Can you see all the sparkle from the Shimmer Paint?
There you have it! I hope these ideas will help get you started on your own holiday cards.
Next up on the tour is the fabulous Connie Babbert. You can get to her blog by simply selecting the Blog link below. See you next month!
May 19, 2009
Crafting on Canvas
Have you ever made a to-do list that just seemed to grow and grow? Well, there are several lying around here, partly because when an idea hits it's jotted down so it's not forgotten. Problem is, we're so busy with the 'everyday' that doing a to-do list comes second.
Two weeks ago I was given the boot (laid off). It was bittersweet really, losing a job is never good but at the same time it relieves you of office duties to catch up on things that have gotten away from you (like your ever growing to-do list). Thus began the completion of a baby canvas that was started weeks (OK, months) ago.
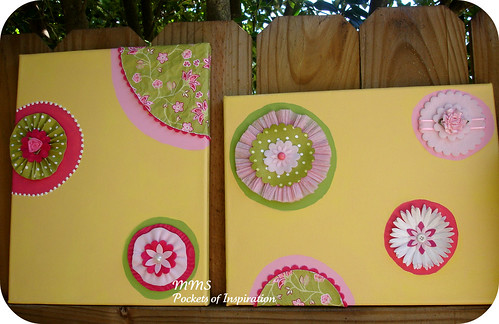
Below is the finish product. It came out nice (I think). Kind of plain really, but the pattern to the baby's room was really simple, so this worked out well. The main canvas was painted with acrylic and then embellished with felt scallops and daisies using dies, fleece, crepe paper, buttons and various odds and ends around the house. This was so much fun to make!

Here's a close-up of one canvas (view the other canvas by selecting this Flickr link or on the right side of this blog).
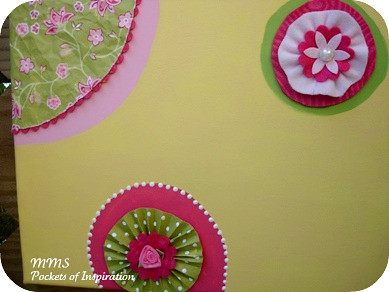
The left corner of this canvas uses "Raspberry Tart" designer paper by Stampin' Up! It really was the perfect compliment to this piece given the colors being used. The pink flower on the bottom left was originally from my daughters ballerina dress when she was two years old (she's almost 13 now). Just goes to show that all the 'stuff' we gather can be put to use, eventually.

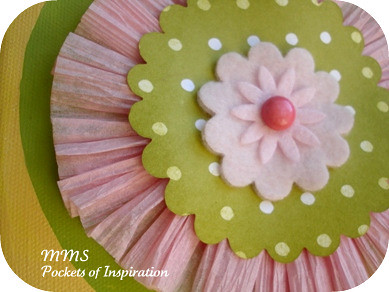
Making this pink crepe ruffle was so much fun! Really gives the canvas some girl frillies.

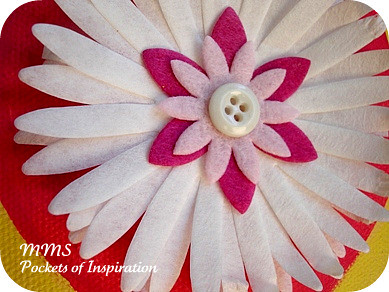
The daisy below was created using a coffee filter. Yep. Got the idea from Ms. Pam Garrison herself! That lady has some AWESOME ideas. Pam used filters to make a garland, but I thought this was just another great way to utilize them. Using tissue paper to make this flower just didn't seem to keep it as stiff as the coffee filter did; it holds up better.

This little pink fleece add-on was the most difficult. All other embellishments were added to the canvas except for the one light pink spot that remained. Mixing fuchsia and the pink was the first option, 4 days, this was the final decision. The softness is wonderful, kinds of tones down the other loud colors (it is going in a nursery afterall).

So, do you think they'll enjoy it as much as I have creating it?
Here is the final product of the Rubbapalooza Spring Soiree. Everyone seemed to create them easely and in their own style. The daisy-like flower below was made with an everyday household item. Any ideas what it is?? If you guessed Coffee Filter then you're definitely on the creative track. It's simply a layering of mulitple daisies from the die mentioned above. The branches and bird were created with THIS die and the main background was created with a napkin and applying gel medium. The options are endless using a technique like this.

Thanks for taking the time to look. Enjoy your Tuesday.
Melanie
Two weeks ago I was given the boot (laid off). It was bittersweet really, losing a job is never good but at the same time it relieves you of office duties to catch up on things that have gotten away from you (like your ever growing to-do list). Thus began the completion of a baby canvas that was started weeks (OK, months) ago.
Below is the finish product. It came out nice (I think). Kind of plain really, but the pattern to the baby's room was really simple, so this worked out well. The main canvas was painted with acrylic and then embellished with felt scallops and daisies using dies, fleece, crepe paper, buttons and various odds and ends around the house. This was so much fun to make!
Here's a close-up of one canvas (view the other canvas by selecting this Flickr link or on the right side of this blog).
The left corner of this canvas uses "Raspberry Tart" designer paper by Stampin' Up! It really was the perfect compliment to this piece given the colors being used. The pink flower on the bottom left was originally from my daughters ballerina dress when she was two years old (she's almost 13 now). Just goes to show that all the 'stuff' we gather can be put to use, eventually.
Making this pink crepe ruffle was so much fun! Really gives the canvas some girl frillies.
The daisy below was created using a coffee filter. Yep. Got the idea from Ms. Pam Garrison herself! That lady has some AWESOME ideas. Pam used filters to make a garland, but I thought this was just another great way to utilize them. Using tissue paper to make this flower just didn't seem to keep it as stiff as the coffee filter did; it holds up better.
This little pink fleece add-on was the most difficult. All other embellishments were added to the canvas except for the one light pink spot that remained. Mixing fuchsia and the pink was the first option, 4 days, this was the final decision. The softness is wonderful, kinds of tones down the other loud colors (it is going in a nursery afterall).
So, do you think they'll enjoy it as much as I have creating it?
Here is the final product of the Rubbapalooza Spring Soiree. Everyone seemed to create them easely and in their own style. The daisy-like flower below was made with an everyday household item. Any ideas what it is?? If you guessed Coffee Filter then you're definitely on the creative track. It's simply a layering of mulitple daisies from the die mentioned above. The branches and bird were created with THIS die and the main background was created with a napkin and applying gel medium. The options are endless using a technique like this.
Thanks for taking the time to look. Enjoy your Tuesday.
Melanie
March 28, 2008
Carousel Notes Purse
Recently a fellow demo (Jan Tinklenberg) created a project with the SU! Carousel Notes (which are large 6" scalloped notecards and 6x6 chocolate envelopes). I've changed a few things here there, added my own stamp set and Walla!
Wouldn't this make a great one-af-a-kind Mother's Day gift or a special gift for someone? I'll be offering this special class at my home in just two weeks! Each workshop guest receives one full pack of Carousel Notes and Afternoon Tea designer paper. If you'd like more details and aa few more 'sneak peeks' of this great project, just send me an email info@rubbapalooza.com.
Can't make my class, order this project via mail and receive the step-by-step tutorial.
Subscribe to:
Posts (Atom)